


ANNOYTOOLS 3018 plus CNC Product Review

ANNOYTOOLS 3018 plus CNC
Is there a place for the 3018 Plus CNC in my shop?
My workshop is more high-tech than most other ones. In addition to a large assortment of the usual woodworking stationery tools, I have two large format CNC machines, three 3D printers, and two laser engravers. My CNC machines can carve up to 30”x 60” pieces on one of the machines and a full 4’ x 88’ sheet of goods on the other one.
When I had the opportunity to review the ANNOYTOOLS 3018 Plus CNC desktop CNC, I knew its size would be better suited to make many of the smaller pieces I create. The ANNOYTOOLS 3018 PLUS CNC has a bed size of approximately 12” x 7.” It also comes with a collet sized to accept my 1/8” diameter engraving bits.
Due to its physical configuration, the 3018 Plus CNC can achieve a vertical stroke of 80 mm. At over 3 1/8” of vertical cut capability, the 3018 Plus CNC can cut some jobs that my larger CNC machines cannot perform without splitting the parts. I also like the idea of a machine that will process various materials, including wood, plastic, acrylic, PVC, PCB, and soft metals like aluminum and copper.
While the larger machines can cut small pieces with 1/8” bits, the hold-down jigs, and fixtures are better suited for larger-scale work. Using the larger machines also means reducing the ½” native collet size down to 1/8” with a series of bushing reducers. While I cannot prove it, I always feel using these bushings creates less accuracy and represents a less safe process.
The ANNOYTOOLS 3018 Plus CNC should fit nicely into my workflows and save time on the larger machines. As a result, I was looking forward to getting to know and use this desktop cnc machine.
ANNOYTOOLS 3018 Plus CNC Specifications
| Work Area | 300x180x78mm (11.81 x7.08×3.07inch) |
| Drive Type | Chrome Plated Shaft 84 T-Shaped Screw Rod |
| Control Board | 3Axis V5.2 GRBL 1.1f |
| Stepper Motor | nema17 42x48mm |
| Stepper Motor Drive | A4988 |
| Spindle | 52mm 500W 12000RPM |
| Power | 48V 500W |
| Max Motion Speed | 5000mm/min |
| Max Process Speed | 2000mm/min |
| Max Accelerated Speed | 200mm/s2 |
| Accuracy | ±0.1 mm |
| Limit Switch | Yes (X1, X2, Y1, Y2, Z1, Z2) |
| E-Stop | Yes |
| Z-Probe | Yes |
| Software | Candle |
| Laser | Support laser module with 40mm width 12V |
| Operating System | Windows XP/7/8/10 Linux |
| Machine Weight | 11kg (24.2 lb) |
| Overall machine size | 485x415x374mm (19.09×16.34×14.72inch) |
For the readers who may not be familiar with these types of CNC specifications, I will summarize the list below. The ANNOYTOOLS 3018 Plus CNC has:
- Lead screw-driven movement (a really good and accurate system)
- An industry standard GRBL computer (Means lots of ITO support and Users)
- Good-sized stepper motors to drive the X, Y, and Z axes
- A reasonably sized variable speed spindle at 500 Watts
- Fast Speed Capabilities for machine movements and production runs
- Very good machine accuracy (±About the thickness of 2 human hairs)
- Excellent safety switches for homing and machine/operator safety
- An Emergency Stop Button
- A probe for setting the vertical axis reference point after tool changes.
- Operating Software loaded on a Thumb Drive (Along with some trial files and documentation)
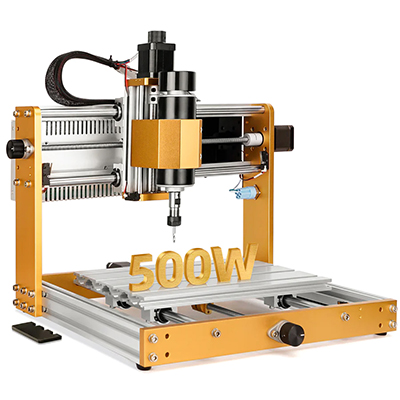
In summary, the specifications are perfect for a capable desktop cnc machine. The following image is the as-built machine.
Unpacking the ANNOY 3018 Plus CNC
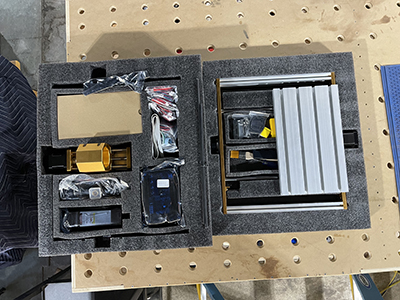
One of the telltale signs of quality from a tool manufacturer is how they package and ship their products. Right after opening the shipping container, I was impressed with the care with which ANNOYTOOLS prepared the 3018 Plus CNC for shipping from Asia.
The equipment arrived without damage, and the parts were well-protected and well-organized. The following picture shows the sections that came out of the shipping box. You can see it is all intact.
I appreciated the initial parts of the manual that not only indicated what parts had been shipped and their location within the parcel. See a sample of the pages from the manual that tell the user ‘what’ and ‘where.’
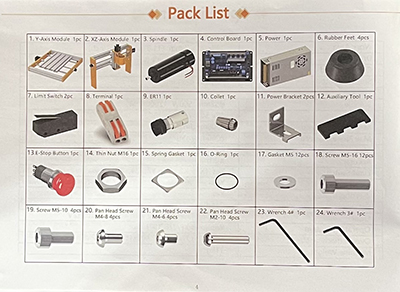
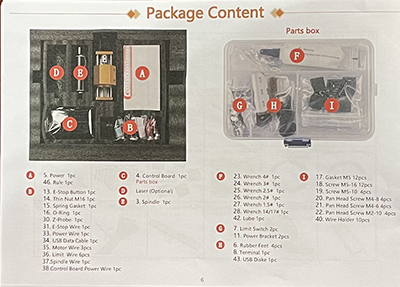
The ANNOYTOOLS folks did a great job with the packing. Everything was named, easy to find, and included within the kit. This attention to detail certainly helps make the assembly of the machine much easier.
Assembly
I started in the CNC world when I designed and built my first CNC machine in 2013. Ten years later, the ANNOYTOOLS 3018 Plus CNC assembly was very straightforward. I assembled it as though I had never done one before. The Instruction Manual was quite detailed and guided my efforts with no issues. I also appreciated the spacer they include so that the tee nuts can be spaced out accurately before you assemble the X-Z portion of the machine. Great attention to detail.
The only ‘glitch’ in the entire process was a mismatch between the space between the 20×20 aluminum rails on the X-Axis and the size of the plate that supports the controller board. I worked around the issue by only supporting the board with the bottom two screws. I will solve the issue by making a couple of simple 3D-printed brackets to make up the difference.
Other than that single issue, the build process was smooth and went according to the ANNOYTOOLS instructions. I give the manufacturer high marks for the assembly instructions and the fit and quality of the parts. The completed assembly picture follows.
It lives!
As good and complete as the machine assembly documentation is, the following steps are complicated for a layperson. Moreover, the steps are not evident if one has never gone through the process before. I wish that the initialization steps were given more attention. Here is what I did and may be helpful to to get a new user a roadmap to follow. My procedure is certainly not the only way to complete the installation. It is simply a script that I documented and the results worked for me..
Initialization
- Plug the Thumb Drive into your PC and explore the directory
- You will find and install a driver file for getting your 3018 to communicate through a serial port on your computer.
- Install the Universal GCode Sender software in the USG(CNC) directory.
- GO to YouTube and search for UGS Software on 3018 and select an appropriate video
- I found one titled UGS Complete Setup and Starting a Job
- Follow their detailed instructions and create a machine that works correctly.
Air Cutting
Now, you are ready to do some meaningful work with your machine. At this time, it should be set up and running in the correct directions and for the correct distances.
- I learned to Home my machine and reset the machine to an X=0, Y=0, and Z=0 point on the machine bed. I repeated this process with the spindle pulled up and no bit installed. That way, I could be sure I was not going to hurt myself or the machine. I did bottom out the machine a few times and learned to reset and reestablish the starting coordinates consistently.
- I learned that UGS has excellent tools for setting up a machine and that Candle may be a better “run-time” software. Since I had a few issues loading GCode files into UGS, I installed Candle and began to use that as my primary file processing and production software.
- I kept the spindle raised artificially high and “Air-Cut” a few of my standard GCode files. I developed these in Vectric VCarve Pro. In VCarve, I found a machine post-processor that read .nc files and worked well with the 3018 Plus CNC mine. The post-processor I selected is named “USBCNC (mm) (*.nc).”
- After running numerous gcode files. I decided to tighten up the leadscrew backlash nuts following the instructions in the installation manual. I finished my preparations by lubricating the three lead screws with the supplied lubrication and brush. I felt I was ready to tackle an actual production file.
Load the Bits
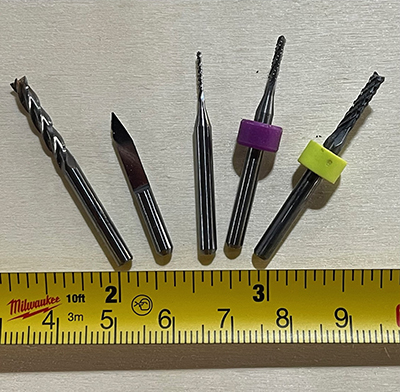
The cutters that come with the ANNOYTOOLS Plus CNC are single-fluted Vee Bits. These bits have an angle of 23.5 degrees and a cutting height of 5 mm at that angle. I needed to set this new tool type in my VCarve bit library to cut the first project accurately. I found a production job well suited for such a Vee bit.
In addition to these supplied bits, I also have several small bits that I have used on the larger cnc machines. As you can see in the picture, some of these bits are small and susceptible to breaking. I look forward to how well these will work in the 3018 Plus CNC machine. I hope to confidently dial in the new machine to enable these small bits to work effectively.
Production Runs
I was ready to cut my first job with the machine tweaked, the design set, and the right bit geometry in the post-processor. However, I had no idea how fast I should run the bit through the wood material. As a result, I chose a conservative group of settings for the first job. I decided to run the job at 200 mm/min for the bit advancement and a plunge rate into the material of 100 mm/min.
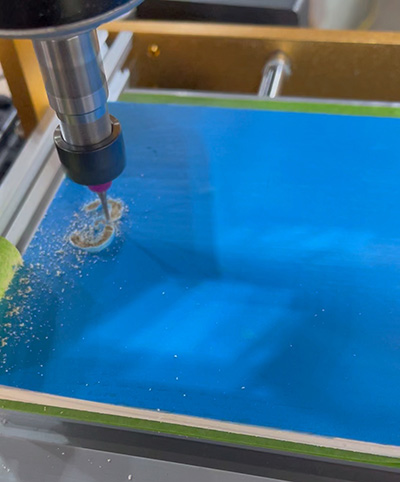
Step-over is another critical setting. This is a distance or a % of the bit diameter the subsequent toolpath moves into the material for the next pass. This setting often determines the apparent quality of the cut (especially for flat-bottomed tool paths). I chose a conservative setting of 9% of the bit’s diameter for this cut. That translates to (3.13mm x 9%) removal of .28 mm of stock for each subsequent pass. That seems small, and I believe the machine and the bit revolving at 12,000 rpm would have no issues handling the load.
Fine Tuning the Feed Speed
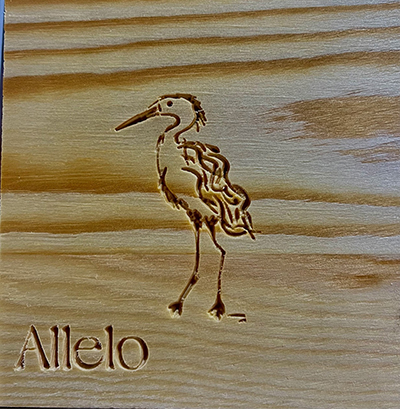
I was correct, and the machine produced an excellent cut on the first production piece. Looking at the time it took to process the work, I could increase the chip loading (the single-factor summation of all the speeds and settings I just discussed) by at least a factor of four. I can accomplish this by deepening the cuts, increasing the speed of the bit’s advancement, or increasing the step-over to take off more material. There are many variables in CNC work, and it takes time and repetition to adjust all of these parameters to get to your own “sweet spots.” The picture of the first cut, complete with the untouched cut edges, follows: This was a 4” x 4” approval proof for a set of several dozen coasters.
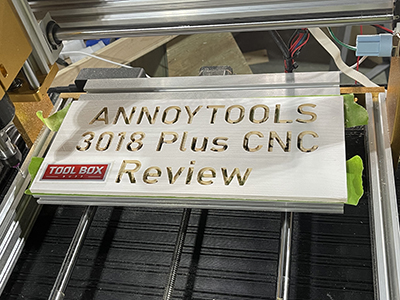
The following “job” I decided to cut was a larger format sign (12” x 5 1/8”). I used a 1.6 mm four-fluted bit (1/16”) and designed the sign to reduce the number of sharp corners. I increased the feed speed to 500 mm per minute and the stepover % to 25%. The ANNOYTOOLS 3018 Plus CNC had no issues plowing through this set of parameters. I routed the sign into a painted board, which produced extremely sharp edges.
Final Thoughts and Next Steps
The ANNOYTOOLS Plus CNC is a great entry-level machine. But it is also a capable production machine for more advanced users, too. I will use the 3018 in my shop when I need to create finer or smaller scale work. The 3018 will free up the production of my larger format cnc machines by offloading appropriately sized work.
I looked up the price of the 3018 Plus CNC at www.gearberry .com, and it lists for a price of $389.00 plus taxes and shipping. That is an exceptional value for such a capable cnc machine. But do not forget that this package also has the bonus of an integrated laser head. So, for this low price, you can have a multi-function cnc router and laser engraver. My book, this product offering equates to an exceptional value.
This link will connect you with the specifics of the product.
Annoytools 3018 plus CNC Router Machine
By the way, Gearberry’s Double Eleven (11.
I have just begun to explore the capabilities of the ANNOYTOOLS Plus CNC. Here is what I want to cover in a future review.
- Adding in the Z-Probe function
- Fitting up the Laser Head and discovering its capabilities.
- Fitting up a dust control vacuum fixture to reduce dust migration.
- Exploring what other 1/8” bits are on the market to add to the production possibilities.
- True 3D carvings
Stay tuned for more reviews of the ANNOYTOOLS 3018 Plus CNC. It will be fun!
About the author
Stan Durlacher
Stan has been involved with Design and Construction in the commercial industry since 1975. He is currently the President of Design and Construction for a major St Petersburg, FL developer. Before that, he was a Project Executive for a prominent Boston Construction Manager, building high-rise apartment and office buildings. One of the hallmarks of his career has been innovative problem-solving. As Assistant Secretary of Transportation for the Commonwealth of Massachusetts, Stan was instrumental in bringing the hydro mill slurry wall machinery and technology to Boston in the 1990s for use on the Central Artery Third Harbor Tunnel Project. Stan has been an avid woodworker since college and brings an innovative point of view to this field. Before Florida, he owned an 1886 farmhouse near Concord, Mass, and his skills and time were never idle for long. His barn and attached spaces serve as his ever-expanding workshop. Stan is a self-avowed tool hound. In 2013, Stan decided to design and build his own CNC router. This machine has become a centerpiece of his woodworking and craft focus. Stan will share many of the ways that this innovative technology has solved many current problems and how CNC will begin to impact the woodworking and home renovation businesses.
Disclosure
Product reviews on this site contain our opinion of a product or service. We will always strive for objectivity and transparency in our reviews. Our goal is to provide readers with honest, objective information based on our own experiences. We never have and never will accept payment in exchange for a positive review. Many of the products that we review are provided to us for free by a manufacturer or retailer. In some cases, we also have advertising or affiliate relationships with manufacturers and retailers of products and services we review. For additional information please visit our additional disclosure policies.