


YetiTool SmartBench CNC Machine

A Seed Change in the CNC World
Many of us have heard the expression “Seed Change.” It means a disruption in the status quo. The origin of the term comes from the agricultural practice of rotating entirely new and radical crops. The modern meaning acknowledges a complete change of the perception of a field of knowledge or practice.
I have seven years of experience with CNC Machines and workflows. I recently had the pleasure to test out and review a truly unique and revolutionary CNC machine. That machine is the YetiTools, LTD, SmartBench.
Getting into the CNC World
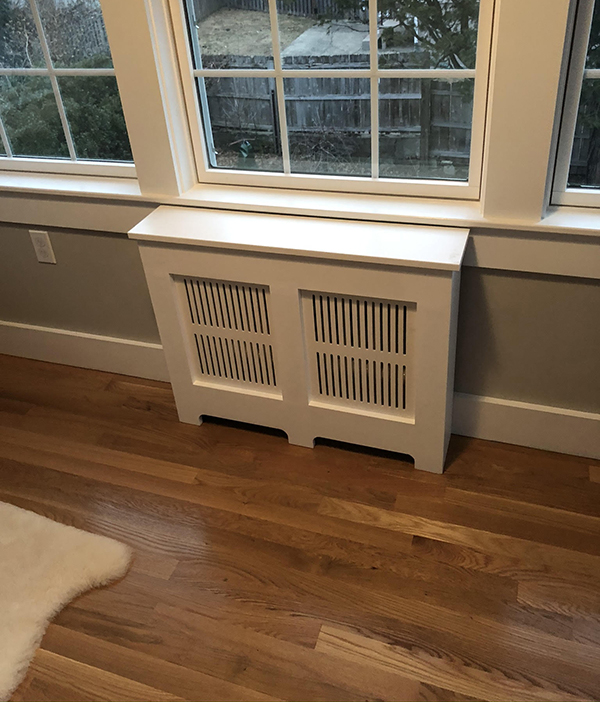
I dove headlong into the CNC experience in early 2013. My son had recently purchased an antique house in need of 18 steam radiator covers. Their first child was on the way, and they were very concerned with a crawling child running up against a hot steam radiator. The covers they found in various places ranged in price from $400 – $650 each, finished and installed.
Of course, each radiator in the house had a different shape and size, so there were no real production efficiencies in fabricating them. They were looking at a project worth between $7,200 and $11,700.
I made my son an offer to take $2,500 of his radiator cover budget and give it to me to purchase the electronics and supplies needed to build a CNC machine. After fabricating the CNC, I would make the covers for him for the cost of materials. The transaction was agreed to, and it turned out to be a great deal for both of us.
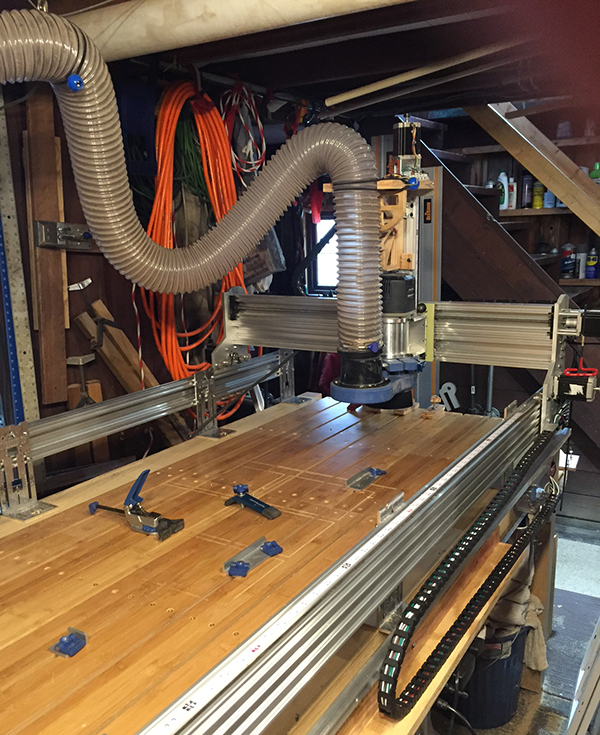
I designed and built “La Machine” (named by one of my daughters) in July of 2013 and fabricated his covers soon after.
Since 2013, I have fabricated over 1,970 different projects/pieces on my CNC machine. La Machine is still going strong, although I have made many machine upgrades and improvements over seven years. Almost every upgrade made La Machine a more robust structure to improve both speed and accuracy.
My Introduction to the SmartBench
As part of the Toolboxbuzz crew, I have had the great pleasure of meeting many people from all over the construction and tool industry. It has been an enriching experience for my vocational and my avocational interests. Moreover, Toolboxbuzz has put me into contact with tools and people I would never have met on my own.
In late 2019, when Toolboxbuzz started to plan a Head-to-Head competition for cordless track saws, we were quite interested in attracting and testing the best saws in the world. While many manufacturers and tool companies knew Toolboxbuzz, we were a relatively unknown entity to the US distributor of Mafell equipment, Timberwolf Tools. We wanted to test a Mafell cordless track saw in our upcoming Head-to-Head and sent an invitation to Timberwolf Tools.
President of Timberwolf Tools, David Powell, was interested in the Toolboxbuzz invitation to join the cordless track saw Head to Head. However, he wanted to meet with Rob Robillard and me first. David wanted to interview us to determine our testing capabilities and understand our proposed testing procedures for the cordless track saws. David had many questions that we could best answer in person.
Rob and I met with David Powell in late December of 2019 in my barn to discuss the cordless track saw test and review. David planned to be in Connecticut and was traveling to his home in Maine. So it was convenient for him to stop off in Concord/Carlisle, Massachusetts, for the meeting.
When David arrived, I slid open the barn door to my workshop, and the first thing David saw was my CNC machine. We had a brief discussion about how and why I made the CNC, and then we began the meeting on the cordless track saws. When the meeting was breaking up, David asked if I would be interested in taking a call from him to dive into more depth and details on CNC machines. We talked a few days later.
The discussion was far-ranging about my experiences with the development and use of the CNC machine. At the end of the conversation, David told me about a CNC machine from the UK called SmartBench that he had an opportunity to import and sell and asked if I had any interest in reviewing it for him. David offered to send over a unit from the UK, and I offered to use the device in my work and to give him my frank opinion on its performance and design
First impressions on the SmartBench:
While waiting for the delivery, I looked at all of the media I could find on the SmartBench. The first thing that struck me was the SmartBench’s ability to process a full-sized 4′ x 8′ sheet of plywood. Its large capacity is a by-product of the innovative machine design that uses a two-piece traveling gantry on the long axis to ‘clamp’ the material between the two halves of the Y-axis gantry. The upper and lower gantry pieces contain rollers that keep the material clamped tightly with the spindle head and machine bed during the gantry travel.
I also learned that the YetiTool designers thought a critical design feature for the SmartBench machine was its ability to be transportable from Jobsite to Jobsite. It was an interesting perspective as my experience has me believe CNC machines are stationary tools that do not move between job sites.
Perhaps the most intriguing feature of the SmartBench was how its unique physical configuration creates an accurate and strong machine. Having designed a CNC machine, I have gone through the tradeoff decisions of machine stiffness vs. cost vs. deflection. The first image I saw of the SmartBench told me the SmartBench design eliminates a great source of backlash (slop) by its unique configuration.
Here is a rundown on the characteristics of the SmartBench.
SmartBench Features:
- Full Sheet 4′ x 8′ portable 3D CNC Router
- Cutting height of nearly 6″ (cutter length dependent) with quick and accurate Z-axis calibration for each tool
- Easily transportable with van, truck, or SUV
- Setup and breakdown SmartBench in 3 to 5 minutes, and < 1-minute tool change-outs
- Brilliant, easy to read color interface with programming functions
- Fast and easy Wi-Fi or USB drive file transfer
- High-efficiency dust collection and removal with an attached vacuum (accessory)
- Finished part accuracy +/- 0.02″ or better, depending on feed rates and number of passes
- Autonomous cutting (set it up and let it run while you prepare the next project)
- Compatible with many materials, including wood, composites, hard & soft plastics, and non-ferrous metals
SmartBench Specifications
| Movement | |
| X-axis travel: | 4.1 ft. |
| Y-axis travel: | 8.2 ft. |
| X & Y max speed: | 19.7 ft. per min. |
| Z-axis travel: | 5.9" |
| Z max speed: | 6.5 ft. per min. |
| Max sheet cut size: | 8.2 ft.by 4.1 ft. |
| Max depth of material: | 5.9" |
| X & Y-axis: | Rack and Pinion |
| Z-axis: | Lead Screw |
| Spindle | |
| Nominal speed - no load: | 10,000 to 25,000 rpm or 10,000 to 29,000 depending upon Spindle |
| Motor: | 120 V / 60 Hz |
| Current: | 9.4 A |
| Standard collet: | 1/4" |
| Max shank: | 3/8" (10mm) |
| Manufacturer: | Yeti/Mafell SC-1 or AMB Elektrik Depending upon Model |
| Physical Dimensions | |
| Length: | 9 ft. |
| Width: | 5.5 ft. |
| Height: | 4.5 ft. |
| Weight: | 167 lbs. |
| Data Input | |
| Software: | SketchUp, Vectric Aspire, Vectric VCarve, Fusion 360, and others |
| File type: | GRBL (known as "G Codes") |
| Accuracy | |
| Machine: | +/- 0.005" (0.125mm) |
| Finished part: | +/- 0.02" (0.5mm) or better* |
| *Depending on materials, feed rates, number of passes, tool condition, and CAM strategy |
Moment Forces Acting in a CNC Machine:
Let me give you a quick explanation of what I mean by this term and why it is an important design consideration.
Accuracy and repeatability are perhaps the two most essential factors in designing a commercial CNC machine. The YetiTool engineers seemed to have recognized and taken on those two design challenges.
A bending moment is a reaction in a structure when external forces are applied at a certain distance.
Most of us learned about moment forces and reactions at an early age from climbing trees. When you put your foot on a limb far from the trunk, the branch bends. Depending on how heavy you were, the branch bends farther the more you weigh. When you climb near the top of the tree, and the branches become smaller in diameter, you placed your feet closer to the trunk. I was always amazed at how much weight a small branch could take when you put your feet right next to its trunk. When the tree climber’s moment force exceeds the branch’s strength, the result may well be broken bones.
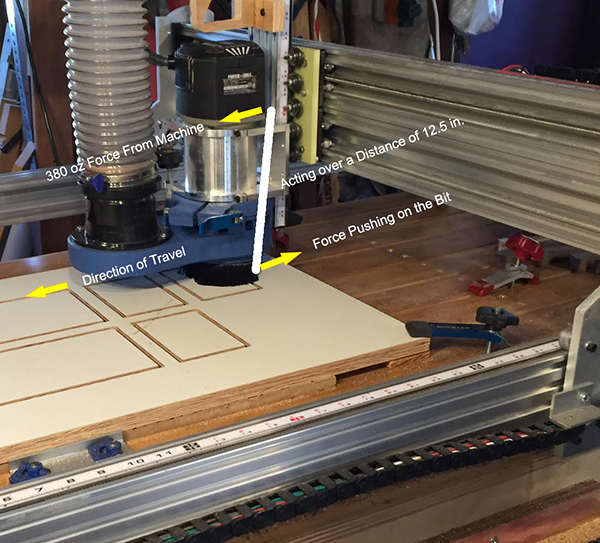
In the CNC world, the same situation applies. As the machine moves the cutting bit into the workpiece, the driving forces create a moment that the machine components must resist. In the case of my CNC, if I apply a force of 380 oz on the X-axis to move the cutting bit, my Y-axis gantry must resist this force to ensure the bit remains horizontal with little or no deflection. A greater applied force will move the gantry faster. The structure must resist the increased moment. That is why many conventional CNC machine designs appear sturdy enough to go off and fight in a war. Their designers made them with tall gantries, rigid structures and heavy-duty enough to counter the moment forces created by high-speed/ high force usage.
La Machine’s design locates the centroid of its Y-axis 12.5 inches above the machine bed. If I apply a 380 oz force in the Y-axis direction, the resulting moment is 297 in-lbs. (33.5 Nm for metric). The image below shows this moment diagram.
Now let us calculate the same 380 oz force acting in the Y-axis direction on the SmartBench configuration. In this case, the centroid resisting the load is located 3.2 inches above the machine bed, resulting in a moment of 76.0 in-lbs. (8.59 Nm). The moment diagram shows this result.
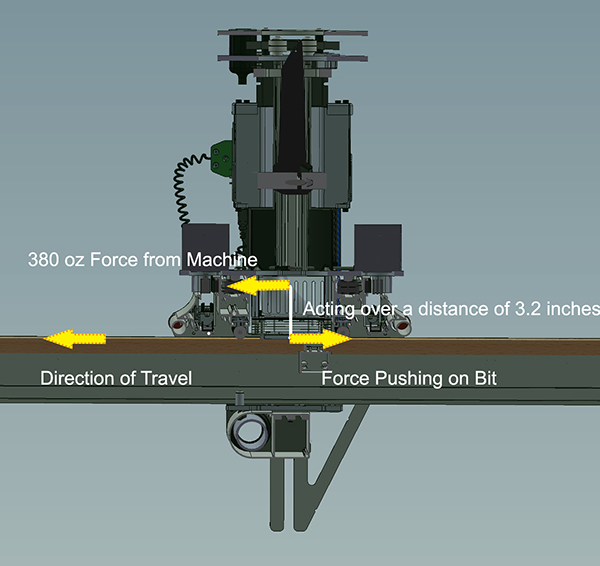
A SmartBench can resolve a 380 oz force with its structure needing the stiffness to resist only 25.6 % of the moment compared to La Machine. Another way to analyze the numbers assumes the SmartBench structure to be capable of withstanding the same 297 in-lb moment as La Machine. Theoretically, then, SmartBench could achieve and tolerate a force of 1,344 oz.
In summary, the SmartBench puts it’s ‘feet much closer to the trunk,’ or the driving force much closer to the cutting bed. That is how the SmartBench can handle similar pushing forces with a smaller lighter design. This is a well-conceived design and produces impressive results.
I would be remiss if I failed to mention the tradeoff that the SmartBench has given up. La Machine can process material heights up to 10.4 inches above the bed. The SmartBench, given a short cutter, may get up to 5.9″.
In summary, I think the SmartBench has made the correct tradeoff decision. I cannot remember processing any material in La Machine that was taller than 4 inches in over seven years.
First Impressions of SmartBench
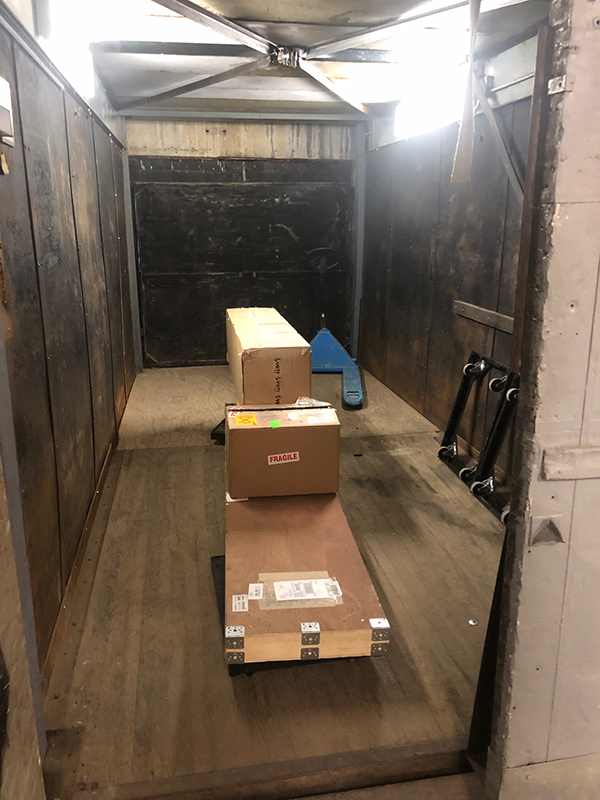
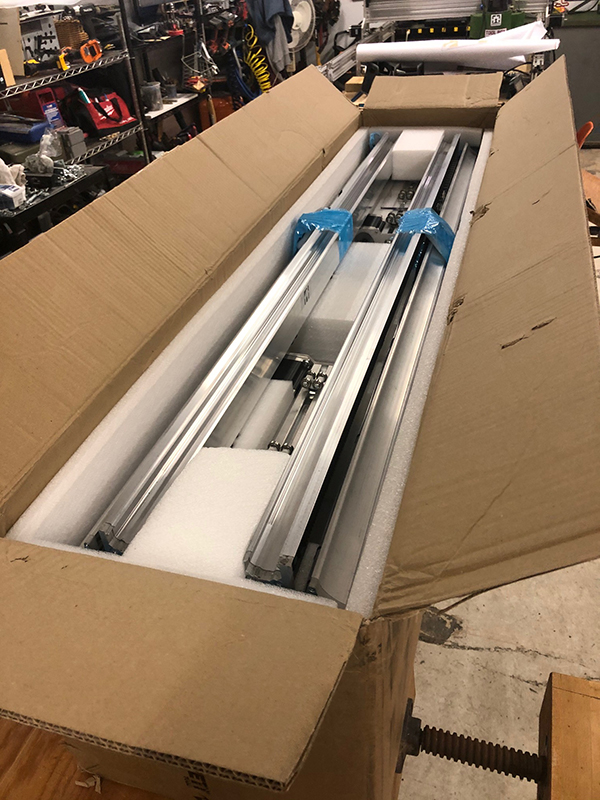
On May 12th, the YetiTool SmartBench arrived in the US from YetiTools, Ltd, in Clevedon, Bristol, UK. The SmartBench arrived in three large containers. Two shipping boxes contained the X-axis gantry and the Z-axis head. The final shipping crate was over ten feet in length and housed the machine frame/ Y-axis. The picture shows the shipping containers in my freight elevator on the way to the 5th-floor workshop.
For many of us, first impressions may well be the most important ones we form.
The quality of the shipping containers and the care with which YetiTools packs the components impressed me. Short of a transport disaster, the SmartBench parts will arrive in the very same condition that they leave Clevedon, UK.
When I unpacked the machine parts and checked them against the YetiTool’s Bill of Materials, I was ready to see how quickly I could build the machine. You see, YetiTools has several videos and literature that tout the ease and quickness of the SmartBench assembly.
In my case, the assembly from start to finish was, indeed, rapid. I assembled the SmartBench from its unboxed components and had it booted up in just under 18 minutes. That is an impressively short amount of time to go from a pile of parts to a complex working CNC machine. (The second time I assembled the SmartBench was well under 10 minutes.)
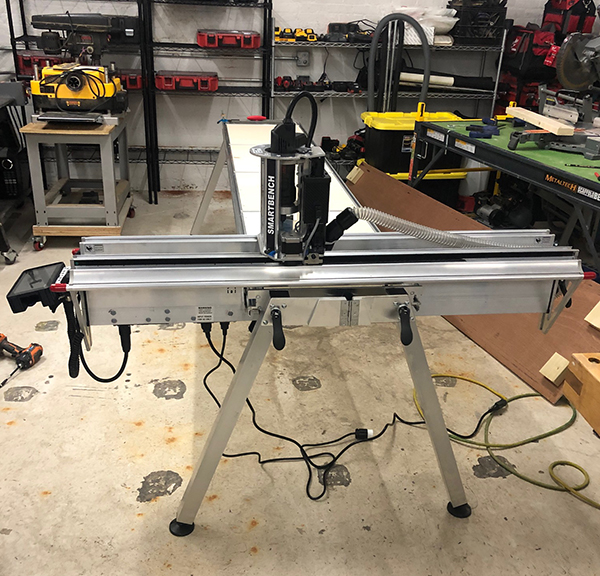
The equipment’s fit and finish were flawless, and I ran into absolutely no issues in its initial build. The instructions were self-explanatory and easy to follow.
I give the SmartBench very high marks for ease of initial assembly and startup.
By the way, I have now used the machine in my shop for a couple of months, and while I do not see a great need to cart a CNC machine around to different job sites, I have taken this CNC apart and moved it several times.
The ease of assembly/disassembly makes the SmartBench ideal for a shop with space constraints whereby the user can free up space when needed by taking it apart and setting it up quickly when the work requirements demand it. My CNC machine simply takes up a chunk of space, and if it is not in current use, I use it for storage. It is 40″ x 72″ with a separate computer console beside it. I have not moved it since occupying my new workshop space.
The final first impression of the SmartBench was the spindle. I designed my CNC with a 3 ¼ hp router with a ½” bit capability. The SmartBench came with an 800-watt AMB spindle with a ¼” maximum shank size. Actually, the AMB spindle will accept 8mm shank diameter (3/8″) bits, but when was the last time you saw an 8mm diameter bit for sale in the US? I thought it would be interesting to use a CNC with approximately 1/3 of the power and substantially smaller diameter bits.
Initial SmartBench Project:
I wanted to give the SmartBench a fair and rigorous trial for its initial project.
The first project I made on the SmartBench was a full-sized Paulk workbench. If you are not familiar with this type of bench, it is a lightweight cube that is held together with puzzle joints and has a myriad of holes for clamps and bench dogs. Building a Paulk bench was a good test for the machined parts’ accuracy over the full 4′ x 8′ CNC bed.
Not only did I need this type of workbench, but I thought that cutting full sheets of plywood with the accuracy necessary to fit the puzzle piece joints together would be a decent challenge for the SmartBench. I had purchased a set of plans for the Paulk Bench, and, of course, I modified these plans to suit my needs. My design added hundreds of holes that I would use with trim head screws to hold the workbench together and saved the Gcode files as a GBL mm file format. For software, I use Vectric Vcarve Pro for the design program and tool path development and Mach 3 for fabrication.
When I loaded the Gcode files and set out to load it into the machine, I discovered that my design and the SmartBench’s native configuration differed. I designed the Paulk bench orientation for the X and Y axes on my CNC.
I caught this difference during the initial exploration of the SmartBench operating software. The program will show you the bounds of the work area superimposed over a graphic of the machine. It was evident that the Gcode would not produce what I intended. I went back to Vcarve Pro and made the appropriate adjustments in the work piece’s orientation to the SmartBench machine.
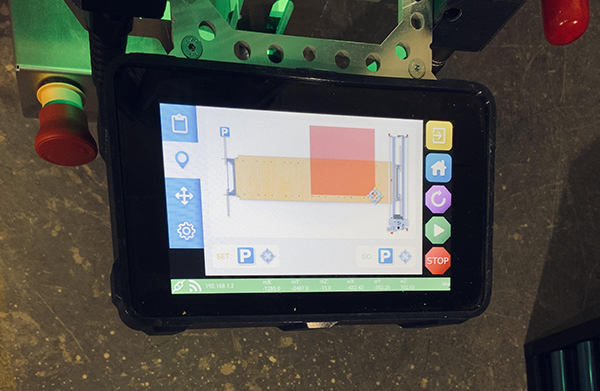
One of the other software features that will assist the user in ensuring the code and machine are in sync is having the machine trace the cut file’s outside limits/boundaries. If the user uses hold-downs, this will give them the satisfaction of knowing that the clearances are correct before making mistakes with finished materials. I find this feature very handy to use – especially for newer SmartBench users.
Getting to know SmartBench
They say that old habits die-hard, and I immediately added a ¾” piece of high-quality plywood as a base material/spoil board to cover the machine bed. I added the plywood piece parallel to the long Y-axis and screwed it to the machine bed’s plywood portion. Now I was almost ready to cut my first piece of the Paulk workbench.
I am a licensed pilot, and I require a sterile cockpit and use a checklist during every takeoff and landing – without fail. Even in my CNC work, I use a checklist and create a quiet workplace when starting a cut. I used my La Machine checklist, clamped down the new plywood sheet, and started the SmartBench’s perimeter tracing routine. The SmartBench began tracing the perimeter of the outside limits of the workpiece. When it nearly reached the far end of the X gantry, the SmartBench abruptly stopped, and the Z-axis head immediately began flashing RED. Whoa.
Chalk this one up to a new experience. I clamped down the workpiece at the very far corners. That certainly works on La Machine but not on SmartBench! SmartBench has an aluminum safety bar at the front and back of the X-axis that breaks contact upon hitting any object in its path. Even though placed at the corners, my clamps interfered with the travel of the SmartBench. You can see the clamp in the upper left corner and the aluminum safety bars with red caps on them in the following picture.
That incident led me to make a SmartBench Pre-flight Checklist and create an item on the checklist that I call “Check for Sterile Work Surface,” meaning no materials or clamps extend above the bottom rollers of the upper half of the Y-axis gantry.
Since using the SmartBench, I have learned new “Sterile Work Surface” ways for various hold-down techniques. The new methods are double-sided tape or using CA glue and accelerator on painters’ tape to apply to the machine bed and the workpiece. When called for, I also screw the workpieces directly onto the machine bed. In the latter case, make sure you know where the Y-axis structure is before inserting the screw. You might hit the aluminum structure or put a screw into the moving Y-axis gantry path.
Since the initial attempts at a first cut, I have maintained a Sterile Work Surface for every other SmartBench project and experienced no crashes.
Now the First Fabrication
Armed with the initial experience, I cut the top of the Paulk benchtop. The work progressed flawlessly, and soon I had a Paulk top with a large number of 20 mm and 1.5 mm holes in it. Then I cut the sides, internal partition, and end pieces. Again, the work went along without a hitch.
I measured the pieces and compared the actual dimension to the as-designed measurements. The SmartBench fabricated the first project pieces to the exact intended sizes within a high-quality tape measure’s accuracy. I measured all three axes, and each was perfect.
The spot-on accuracy was not the only thing that impressed me during the initial workpiece. The SmartBench comes fitted with an exhaust port and an exhaust hose on the Z-axis side away from the SmartBench computer. I attached a small shop vac to the port under the machine and plugged the vac into an electrical outlet provided by SmartBench for this purpose. When a project starts on the CNC, the shop vac automatically starts up. It also shuts off at the end of the piece fabrication.
I took videos of the initial cut from overhead, and I have enclosed one of those frames for you to see the lack of dust on the workpiece. YetiTools gets high marks for the effectiveness of its dust collection on SmartBench.
Fitting the Paulk Together
When I dry-fit the top, sides, and internal stiffener pieces together, the assembly mated perfectly. No tools were necessary for assembly. I did not need as much as a rubber mallet to fit the parts together.

After fabrication, I dropped the bottom piece into the subassembly with perfect tolerances.
I was impressed with the precision with which the SmartBench created these Paulk parts.
Next Projects and New Learning Experiences with the SmartBench
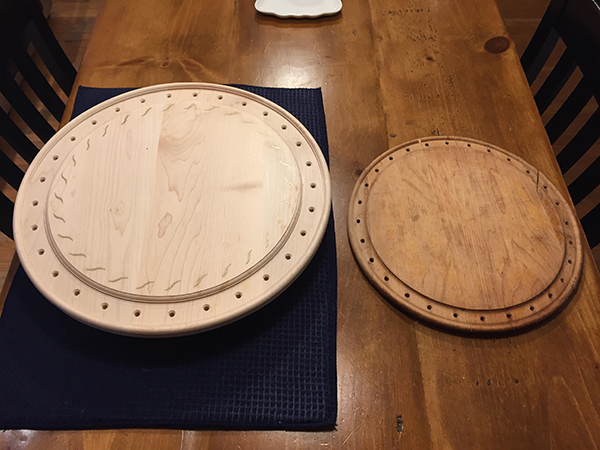
While cutting the Paulk Bench, I noticed that the roller wheels on the upper half of the gantry made marks on the work piece’s top surface. This defect may not impact some projects as the surface can be lightly sanded to remove these roller marks. The next project I wanted to cut consisted of three round and engraved cake plates. I certainly did not want to see roller tracks on the finished hardwood surface, so I made some modifications to the spoil board.
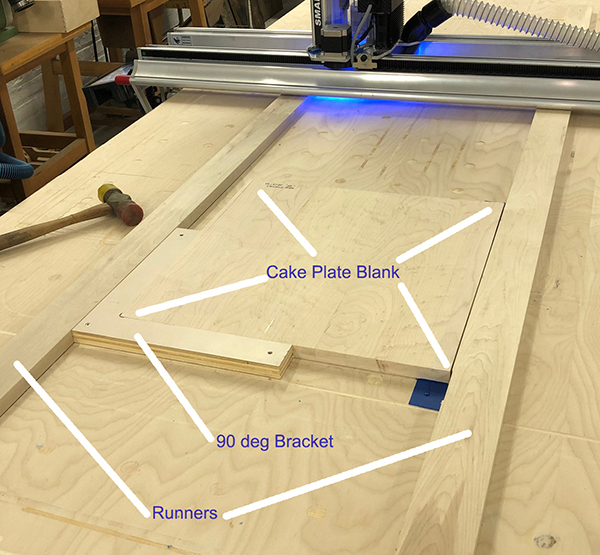
The solution I settled on was to install two hard-maple ‘runners’ the full length of the spoil board. In that way, I could adjust the roller sets on either half of the gantry to contact the runners instead of the workpiece. I fixed the runners to the spoil board so that they were parallel to the Y-axis travel. In that way, I could have confidence when I mounted a workpiece, the edge would align with the Y-axis travel.
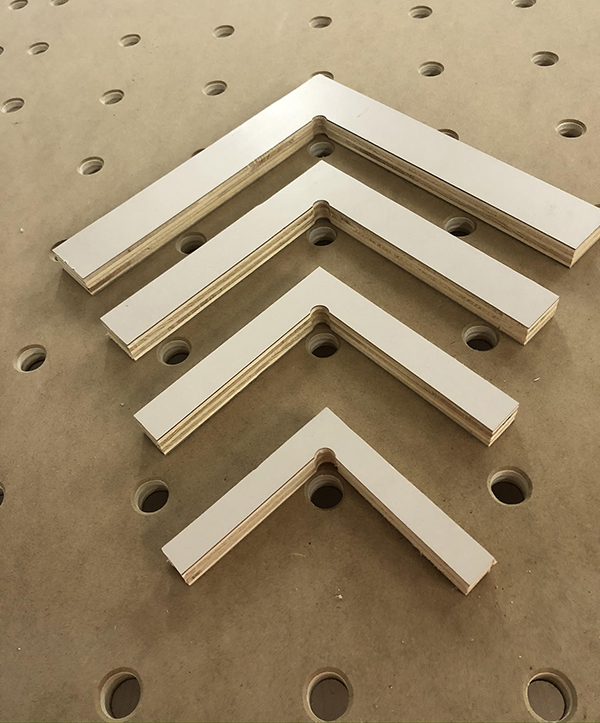
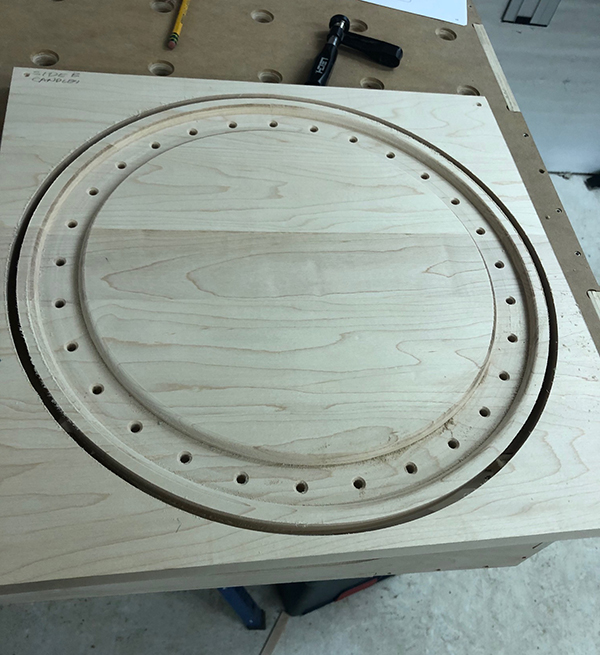
I also made a series of 90-degree brackets to establish a ‘zero’ point for the three cake plates as I designed them identical in size. That way, I could use the same setup to machine all three pieces. I also wanted to test out accuracy and repeatability using this type of fixture. I was hoping to remove and reinstall a workpiece multiple times and register the toolpaths identically each time. The following picture shows the SmartBench with the runners, one of the brackets, and the maple cake blanks ready to machine.
During the fabrication, I carved both sides of the cake plates and removed and reinstalled the workpieces about a dozen times. I am pleased to say that the machine accuracy and my fixturing technique worked very well. For the second project made on the SmartBench, these finished pieces were precisely what the client wanted.
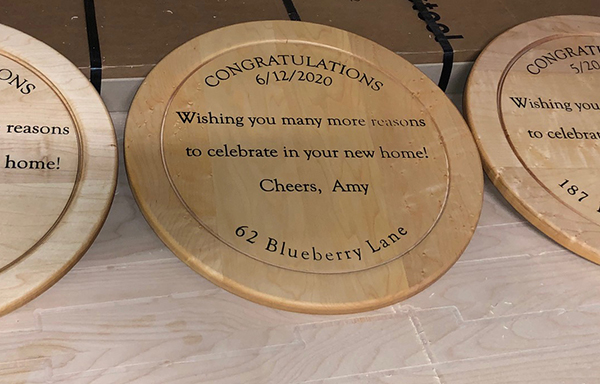
These plates were a replica of a cake plate that my client’s grandfather made, and she was fond of the design. However, she did want the new ones to be made larger than the original ones. I have included a picture of the first piece I made a couple of years ago next to the original work.
In summary, the first two projects I made on the SmartBench turned out exceptionally well, and I learned a lot about the new machine. I must give it the highest marks for ease of use and accuracy.
Glowing Review So Far, But Did Anything Go Wrong?
The short answer is yes. I ran into some issues that taught me a great deal about the SmartBench machine and a lot about YetiTools and Timberwolf Tools. Every customer, manufacturer, and distributor has an excellent day when everything goes very well. When issues arise, the cream rises to the top, or the dregs sink to the bottom.
First, I had an issue with the SmartBench spindle. It simply quit during a cut. I contacted David Powell at Timberwolf, and within a day, I had a new spindle shipped to me from his office in Maine. YetiTools also sent me a new spindle from the UK. YetiTools asked me to return the dead spindle to them for analysis. The new spindle arrived the next day. I was up and running the day the replacement spindle arrived—a great conclusion to that issue.
The broken spindle was an A+ service experience.
During this time, I had an opportunity to meet and discuss the spindle issue with the UK’s YetiTools personnel. I sent them the Gcode cut files, and we talked through the spindle settings and what other problems might have caused the interruption of service. I knew that the parties would handle my situation on a timely basis because I was reviewing their product, but I am confident that any customer would have had the same rapid response in a similar fix.
In a few days, David called me to let me know that a higher precision Z-axis was under development, and asked if I would be interested in looking at it. Of course, I was curious, and the new Z-axis equipment sounded like it had some compelling improvements.
First, YetiTools replaced the AMB spindle with a 1000 watt unit manufactured by Mafell under contract to YetiTools. (The YetiTools spindle is based upon an existing 1000 watt spindle that Mafell currently sells, the Mafell FM 1000 Milling Motor. The YetiTools’ spindle has additional software control and data monitoring capabilities).
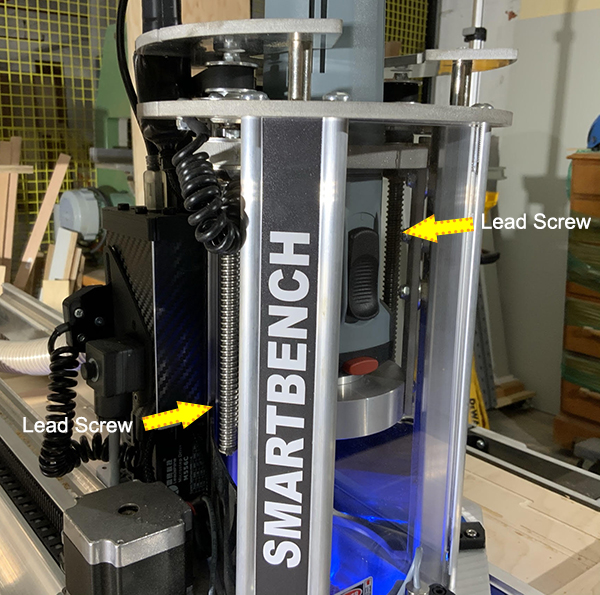
The new head has two lead screws to drive the Z-axis instead of the single lead screw on the current unit. This design would cut down on any backlash introduced by pushing down one side of the collar that houses the spindle. See the picture below for the twin lead screw design.
Another improvement was a new laser to verify that the XY zero point was in a repeatable location. That sounded like a worthwhile enhancement. Finally, new software in the processor would monitor and control the Mafell spindle. YetiTools added a USB data cable between the spindle and the processor. The user can also change the spindle speed on the console and can see if the spindle may be overloading in real-time. All of those changes are quite compelling.

The new assembly arrived in a few weeks. The new equipment upgraded the CNC I was using to the SmartBenchPrecision PRO level. Surprisingly, it took me 7 minutes to upgrade the processor’s software, which was longer than it took me to install an entirely new Y-axis gantry and new head. Everything worked as advertised, and I was quite pleased with the latest improvements. I decided to cut a side section for a Thein Baffle using the new configuration. A Thein Baffle is a clever device used for cyclonically separating sawdust and debris from vacuum extractors.
Uh Oh!
I wanted to get started cutting, but I was careful and decided to ‘air-cut’ the new Gcode file for the Thein Baffle side. So I mounted the workpiece, loaded the G Code file, and changed the Z-axis to a registration zero point about two inches above the actual surface for the air-cut. Finally, I started the carving routine.
My heart almost sank to the floor when the spindle stopped about 15 seconds later. What had I done wrong? I was baffled and did not want to be “That Guy,” the spindle wrecker.
But this story ends quite well.
When I first started using the SmartBench, I was very pleased with the small AMB spindle’s performance. I liked its power and performance and wanted to substitute a smaller spindle for the 15-pound monster router I currently had on my CNC.
As a result, in July, I had purchased a Mafell FM 1000 Milling Motor from Timberwolf Tools to put on La Machine during an upgrade I intended to start later in the year. The Mafell FM1000 and the YetiTools’ spindle shares the same exterior dimensions and mounting collar diameter.
The apparent solution became clear. I mounted my Mafell spindle into the SmartBench head, plugged it into the wall, and kept on cutting. The thein baffle side turned out very well, and the 1000 watts’ additional power and increased accuracy were evident.
I contacted Aaron Thorogood (my contact during the earlier spindle issue) at YetiTools and explained that I somehow broke the new spindle. Over the next couple of days, we conducted a thorough and specific diagnostic and trial procedure to troubleshoot the source. Consistently, the spindle worked for a time without interruption, but as soon as I started a job on the CNC, the identical shutdown occurred.
YetiTools asked me to send them the Gcode during the forensic trials. The good news was that the failures were very repeatable, and the spindle seemed to be operational – mostly. The bad news was that we could not figure out what was causing the fault condition.
Around the fourth day of the examination, Aaron asked me what version of Vcarve Pro I was using. I told him that I had recently upgraded from version 5.06 to 5.07 around the same time as I upgraded the SmartBench software and installed the new head.
The YetiTools engineers tracked down the problem to a software bug in the new Vcarve Pro software version 5.07. It seems that the software arbitrarily added an “S0” code into a line of the Gcode. The “S0” command tells the machine to stop the spindle (provided the particular spindle is equipped with the electronics to utilize software control capabilities). In my case, the Gcode told the spindle to stop running, and the machine software told the SmartBench to stop moving and raise the spindle from the workpiece.
Nothing was flawed – everything worked as planned. The errant “S0” code simply prevented the SmartBench from fabricating the work.
I took a look through my Thein Baffle G Code file, and sure enough, there was an “S0” string in the 13th line of code. I then deleted those two characters and saved the revised Gcode file. Next, I reinstalled the YetiTools spindle, hooked up the data and power cables, and loaded the modified Gcode to start the cut routine. The SmartBench went about its business and cut me a perfect Thein Baffle side. I encountered no further issues whatsoever. (I am now running Vcarve version 5.08.)
The reason I took the reader through this long-winded story is to provide the background as to why I give the Timberwolf and YetiTools an unqualified thumbs up for customer service and technical expertise. I have experienced many different successes and failures with manufacturers’ and distributors’ customer service organizations over the years.
Without reservation, I rate this combination of Timberwolf Tools and the YetiTools team at the top of my list.
Would I Change Anything or Have Any Recommendations?
The short answer is I would change very little about the SmartBench. But I do have a few items to recommend.
I would fabricate some new dust collector pieces to insert into the cutting head base for those times I plan to cut a project thinner than the height of my runners. The dust extraction does not work as well when there is a gap between the bottom of the factory-supplied dust collector unit and the workpiece. In fact, I would fabricate a set of deeper inserts to provide for the common thin materials I process.
I will pitch another modification to increase the dust collection port’s size that sits between the head and the dust collector hose. Occasionally the G Code steps call for chips to be cut along the grain direction, making ‘noodles’ – long stringy chips. These noodles have caught in the opening to the dust collector hose and choked off the airflow. This modification will take some surgery as the dust collection does pass through the head’s aluminum base plate. Any larger dust port means a redesign of that aluminum plate. This redesign should also take care of a small amount of dust that currently leaks out of the current fittings.
I recommend that the new SmartBench users be comfortable with using the metric system. It will make their experience easier as the machine firmware and operating system require the Gcode to be compiled in the metric form of GRBL for VCarve Pro’s G Code files. I am now designing all of my SmartBench Vcarve files in metric dimensions. I suppose other VCarve users might create in imperial measurements, but the user must then convert that design file to metric dimensions and compile that file in metric GRBL form.
Finally, I spent seven years getting used to designing and fabricating pieces with the X-axis as my long travel and Y-axis as my cross travel in the configuration I have on La Machine. The SmartBench configuration has these axes in reverse of La Machine. I still like to use the cut files that I designed years ago on the SmartBench. When using older files, I catch myself going back and changing the orientation and reference point on these Vcarve files. I would recommend a way for the initial X-Y configuration to be user selectable at the time of purchase.
I am an old dog, and new tricks are tough for us. But seriously, a company with its current machines configured differently from the SmartBench will cause a steeper learning curve for their personnel and may introduce wasted materials for that company.
Other SmartBench features that I like but have not even mentioned thus far:
- The user interface software is intuitive, user-friendly, easy to learn and navigate.
- The Z-axis uses a lead screw drive.
- The X-axis and Y-axis have a rack and pinion drive.
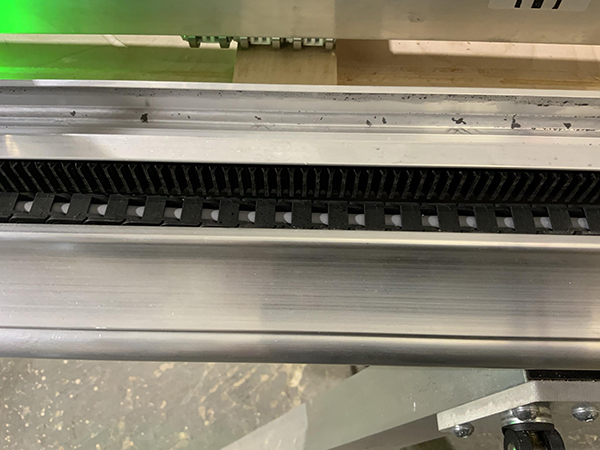
- The SmartBench has a well-designed location for the drag chains that house the interconnection cables between moving machine parts. Most CNC drag chains are close to machine components but are basically exposed and subject to damage. The SmartBench drag chain can be seen tucked away under the drive rack in the picture, below.
- YetiTools made the dust collection insert from plexiglass and allowed the user to observe the cutting bit and material.
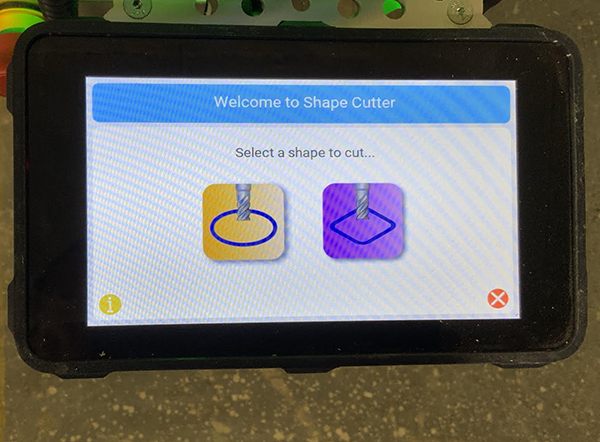
- I have not even used the included Shape Cutter routines in the SmartBench software because of my years of experience. The software is intuitive and gives a new user a rapid capability to cut simple shapes.
- The files can be loaded over a wireless connection or by sneakernet with a USB drive.
- The head’s LED lights are a good check on the machine status. From across the room, I can instantly see the machine state by color. Green is good and red is bad. Other colors and flashing sequences represent various machine actions and states.
- SmartBench is a set-and-forget machine (after you know how to use it), allowing me to perform other tasks simultaneously in my workshop.
- This CNC is easy to knock down with one person and store in my shop when I need additional space for other projects – like testing cordless track saws.
- The three current models and offered features appear in the following table
| Feature | Standard | Precision | PrecisionPro |
| ZHead V2 | Y | Y | Y |
| Dual Lead Screw | Y | ||
| AMB Spindle | Y | ||
| YETI SC1 Spindle | Y | Y | |
| Manual Speed Control | Y | ||
| Digital Speed Control | Y | Y | |
| OZ Collet | Y | ||
| ER16 Collet | Y | Y | |
| Tool Auto Stop Under Excessive Load | Y | Y | |
| Real Time Spindle Load Display | Y | ||
| Laser XY Setting System | Y |
SmartBench Economics
I have nothing but the highest honors to bestow on the YetiTools SmartBench. It is a fine machine in its standard configuration and a nearly perfect machine with the upgraded head. It will cost you some money to purchase, however.
The most compelling question is whether the SmartBench is a good value in the CNC marketplace?
I did a bit of research on the Internet to compare how SmartBench stacks up against other market offerings. To create a basis for comparison, I decided to create a metric for the analysis. Of course, the Internet was where I went to determine the published purchase prices of 9 additional CNC machines (with a computer included). The metric is the fully loaded purchase price divided by the cutting bed area. How many dollars does it take to buy a square foot of the CNC bed area?
In the SmartBench case, I used their listed price for the SmartBench PrecisionPRO machine at $8,145 and a cutting area of 33.6 Sq. Ft (4.1 x 8.2 Ft). The SmartBench metric of $242.41/Sq. Ft is the yardstick against which I measured nine other CNC machines.
A word on my research: I tried, as best I could, to ensure that each machine was complete with a CPU and machine software included. In some cases, I could not find those specifics. When I discovered a CPU necessary for a complete configuration, I added $750.00 to the manufacturers’ published prices. Note that these prices do not include shipping costs.
Finally, I limited my search to nine other CNC machines. These machines were familiar from my social media exposure and personal market knowledge. I did not conduct an extensive search for any other machines.
In no case do I suggest that this list is an all-inclusive analysis. I invite any readers to do their own metric comparison if they have a particular machine in mind.
It is interesting to note that the SmartBench is truly a plug-and-play machine. It comes complete with everything you need to create a workpiece. All you need is a compatible Gcode file and cutting bits. I am not 100% certain that every machine included in my research can make that claim. Purchasing a CNC machine is involved, and the buyer needs to make sure they have everything necessary to operate.
The SmartBench metric of $238.10/Sq. Ft is truly impressive. The next closest $/Sq. Ft metric is a machine with a bed that is 1/8 the area and costs 2.4 x more on a $/Sq. Ft basis.

Timberwolf Tools also offers a financing option for SmartBench that starts at $171 per month. For the machine billing rate I charge for La Machine, I could pay for that SmartBench monthly payment in less than one half of one day of billable time.
YetiTools SmartBench is genuinely an exceptional value.
Summary
I close this review by restating that the YetiTools SmartBench is a Seed Change in the CNC marketplace.
SmartBench is designed and manufactured by an exceptionally talented, innovative, dedicated, and responsive set of personnel in the UK. In addition, the SmartBench is distributed by a uniquely responsive and caring company that sells and services a series of the highest quality and innovative tools in the US – Timberwolf Tools.
I look forward to seeing SmartBench’s progress in the marketplace, and I give YetiTools the highest marks for creating a revolutionary machine. It has been a pure pleasure to use and review the YetiTools SmartBench.
Postscript:
Since finishing the final draft of this review and its publication, I learned that the unique clamping system on the SmartBench is under patent consideration in the US and EU. Also, YetiTools is considering a 63mm (2 ½”) dust port for the SmartBench.
About the author
Stan Durlacher
Stan has been involved with Design and Construction in the commercial industry since 1975. He is currently the President of Design and Construction for a major St Petersburg, FL developer. Before that, he was a Project Executive for a prominent Boston Construction Manager, building high-rise apartment and office buildings. One of the hallmarks of his career has been innovative problem-solving. As Assistant Secretary of Transportation for the Commonwealth of Massachusetts, Stan was instrumental in bringing the hydro mill slurry wall machinery and technology to Boston in the 1990s for use on the Central Artery Third Harbor Tunnel Project. Stan has been an avid woodworker since college and brings an innovative point of view to this field. Before Florida, he owned an 1886 farmhouse near Concord, Mass, and his skills and time were never idle for long. His barn and attached spaces serve as his ever-expanding workshop. Stan is a self-avowed tool hound. In 2013, Stan decided to design and build his own CNC router. This machine has become a centerpiece of his woodworking and craft focus. Stan will share many of the ways that this innovative technology has solved many current problems and how CNC will begin to impact the woodworking and home renovation businesses.
37 Comments
Leave a comment
Disclosure
Product reviews on this site contain our opinion of a product or service. We will always strive for objectivity and transparency in our reviews. Our goal is to provide readers with honest, objective information based on our own experiences. We never have and never will accept payment in exchange for a positive review. Many of the products that we review are provided to us for free by a manufacturer or retailer. In some cases, we also have advertising or affiliate relationships with manufacturers and retailers of products and services we review. For additional information please visit our additional disclosure policies.


yeti tool dot com – not tools
k thx
This is a very well written and informative review. I have not considered a CNC purchase before but this makes it seem much more reasonable for small shop. Thank you for the detailed analysis.
Thank you for the note. The SmartBench is well worth considering.
Thank you very much for your detailed review! I am considering to purchase a smart bench and I am gathering all the information i can find.
Right now I am working with a Maslow CNC but the machine has good and bad days and since a while it causes more trouble than giving well cutted pieces.
So yes, I guess I’m one step closer to buy the smart bench.
I would encourage you to really look hard at the SmartBench. If you would like, I can get on a Zoom call and answer any questions you may have.
Let me know if I should DM you. Good luck.
Hey Stan,
thank you very much for your offer! I am lucky to have found another smartbench user in a town nearby. He will show me the machine and let me try a small own projekt. In a call with him I could learn a lot about the machine but I will be gratefull if you DM me because I might have some questions for you too.
Again, thanks alot!
I will DM you, shortly.
Hi
Great article. I’ve been looking at these from before the lockdown UK side and this article persuaded me to have a good look. So I was able to go to Yeti’s new place in Portishead (4 times the size of their old place in nearby Clevedon) myself and my son were shown around by Aaron and We were very impressed by everything especially the people.
They have an excellent attitude to what they are doing. I regard where they are now as the Apple 2 level. They’ve brought Cnc to your shed!
Long story short I bought one!
Excellent to hear that you purchased one. I will DM you my information so that you can get in contact with me if you need or wat to discuss any issues youcome across.
Hi Stan
Thanks for keeping me in the loop. I now have the Yeti up in my (tiny) workshop and am starting to play with it.
As an ex lecturer I like to start slow and build good habits!
First thoughts extremely well made the packaging is excessively robust, they understand the reality of the delivery process!!
The bench is actually much more stable than I thought and will also eventually serve as an outsized MFT.
I calibrated the tool and next time I’ll need better glasses and a vernier gauge as it was more accurate than my eyes or tape could see, Ie spot on.
I’ll pop in a few more comments as I go along.
Kind Regards
James (Seamus)
Hi James – My machine was spot on as well. Having used it extensively for nearly a year, I continues to remain in calibration and I have done very little in the way of adjustments. I use the recommended SmartBench maintenance intervals to check the precision and have made only one slight wheel adjustment. Keep us posted as to your experiences. Stan
Stan,
I purchased a SmartBench in August and had the same experience as you did. It meets my requirements and I am extremely happy with my SmartBench.
Yeti Tools service is superb. I also had a few issues and they resolved them very quickly.
The biggest issue that I had was rethinking hold downs. I am still struggling with this.
I have used the tape and glue methods, and the screwdown methods.
Would you be willing to share what you have learned?
I will DM you to see if you would like to discuss on a teleconference call.
Hello Stan – thanks for the really informative article.
I have been considering the Smartbench for production of camper van furniture for my business. I would want to cut nested parts, typically from 2.44 x 1.22m 15mm laminated lightweight ply sheets. Ideally, we look to optimise the nesting to get the maximum value out of the sheet. My concern is whether this is possible given Smart Bench’s roller design and what happens when the top rollers encounter a void in the workpiece. I don’t want to have to continually move the rollers, and I’m not sure how practical it would be to leave safe areas/lanes for the rollers given the variety of components in a single job.
Any wisdom/advice would be much appreciated.
Hi Martyn. Thank you for the feedback on the SmartBench article.I believe that he SmartBench will be able to accomodate the nesting of parts with its upper rollers encountering voids in the workpiece. I have never counted the actual number of rollers on the upper portion of the X Gantry. However, in looking at my pictures, I believe there are 16 or 18 roller wheels on each half of the x axis gantry. That is a large number (32 or 38) of rollers that can support the upper half of the gantry. As I showed in my article, I used the maple rails where I have only had 4 rollers per side (8 in total) in contact with the rails. I still had a very accurate cut. The SmartBench should clearly have the ability to roll over the several voids in your nested layout and still have a large number of rollers in contact with the workpiece. I cut many Paulk workbench pieces with nested parts wherein the rollers went into the voids. I have not had any difficulties whatsoever with the cut quality or precision. I think your concerns will be not be an issue with the SmartBench.
HI Stan – thanks for the swift response, it’s much appreciated.
The next step for me now is to book a demo through Trend in the UK which sounds like a very similar dealer partnership with Yeti and Timberwolf.
If everything checks out and we buy a SmartBench I’ll post our thoughts and results.
Thanks again – Martyn.
Hi Martyn – I look forward to your progress with the purchase and use of the SmartBench. Keep us posted. Stan
Hello Stan,
I’m doing the ‘data gulp’ having just tripped over this item (oddly enough, researching Hafele cabinet base legs). One man shop, I can’t see how any small shop (other than those with well understood and narrower range products) can do well in the long run without a cnc. It’s just too much of a time saver (even if only for jigs). The Shaper Origin is interesting, and has a case use. It seems a little narrow in its application range, aside from job site work. The Yeti — that strikes a chord. I suspect I am not alone in that occupied space needs to be very useful. And a way to cut down on the variety of equipment and space occupied has a high value.
I’d appreciate a DM. Thanks!
Michael
Dear Michael,
i recently bought the Yeti and I can tell you it is a gamechanger for my little workshop. We are three guys working in a quite small place and the flexibilty is amazing. For a recent project I needed to drill rows of holes into 50 parts, the yeti might be slow but it is steady. The accuracy is totally fine for my needs. I mean, we are working with wood, a material which changes its dimensions with the change of humidity. For this an accuracy of 0,5 mm is totally fine.
I putted a 16 mm MDF with holes in 20 mm diameter as basis for all my cuttings. Combinatet spanners and stoppers hold my parts in position and i can repeatedly place my parts in the same position.
And if you have to stopp for one day and start over the next day, the machine doesn’t lose the set home datums.
And best part, if I need space in my workshop, I just dismount the yeti within minutes and store the parts hanging on a wall.
I own the machine for 6 weeks and i made a lot of nice carvings, jigs, cabinet parts.
The dust exhaustion could be a bit better, but that might also refer to my vacuumcleaner. Once i had the problem of a plug of dust inside the hose and all the dust accumulated in the rails and suddenly prevented the machine to move smooth so the motors lost some steps and the accuracy was gone. So take care and always listen to the sound of your vacuum and observe the exhaustion.
I highly recommend the yeti.
Greeting from Cologne (D)
Martin,
I also have a Teti and am quite happy with it. Could you share your hold downs/spoilboard ideas. Pictures are great
Thank you Stan for your in-depth review. I’d say it is quite refreshing for me to read about such a detailed write-up, especially about machines, outside of some certain forums. I’m looking forward to your future posts and also delighted to learn about the experiences you share! Cheers!
Thank you for your note. That was a fun review to do and I had a lot to say and share.
I am interested in making copies of my grandfather’s wood carving of the Lord’s Prayer. Do you recommend having someone do it or learning to use a CMC machine and doing it myself? Framed piece is about two by 3 1/2 feet tall. What sort of digital file is needed to capture the work in a digital format?
Hi Jim:
It is certainly quicker and easier to have someone make the files for you than learning to do it yourself. I know that I would need =only a crisp .jpg file to create the cut files. II use VCarve Pro and Aspire. Both programs make the conversion from photos to Gcode files relatively easy to accomplish. IF you want to explore this further, I will send you my DM.
Stan
Thanks for the detailed writeup — after reading it, the Yeti has moved to the top of my list. I have a few friends who all have occasional use for a CNC Router — the fact that this is portable opens up the possibility of sharing one — whenever someone needs it, they can pick it up from the previous person to use it.
Hi Chris:
I think you have emphasized a very important point about the SmartBench. It is quite practical to knock the machine down and transport it between your users. It fits easily in the back of a medium or large SUV. My experience in breaking my machine down to relocate into different areas of my shop has proven to be a knock-down of about 2 minutes. Reconfiguring it in the new area is now about a 3-4 minute duration.
Each time, the SmartBench re-homed itself and found my 0, 0 origin with no loss of accuracy.
I look forward to hearing how you and your friends do with a shared device. Best of Luck, Stan
Hello
For making such projects as the Paulk bench is vcarve pro too
sophisticated? I am researching cnc machines and software to make fairly simple cabinets and ‘flat’ items. So maybe something like cut2d etc?
Hi Roger: You ask a very good question. I think one of the great things about VETRIC is that they will bump you up the chain of sophisticated products with a very cost effective upgrade path. VCarve Pro took care of all of my needs for 13 years. I have recently upgraded to Aspire. Start with the Vectric basic package and then take the next step when you are ready. By the way, this Vectric interface remains consistent all the way up the product chain so you will not be relearning a new interface with each product. BTW – I highly endorse the YETI Tools SmartBench for flat work because of the ability to take a full sheet of plywood or other flat stock on the bed. Good ;uck. Stan
thank you for your help!
I’m curious if anyone has used the smart bench to flatten an occasional slab?
Scott,
Here is Eric at Teti SW surfacing a slab.
https://www.youtube.com/watch?v=pHYGp1D35z0
Hi Bob
Thanks for sharing the YETI SW video. It certainly shows the ability to flatten a very large slab.
Stan
Should be no problem to do the slab flattening. The only limitation is the 6 inch vertical clearance under the gantry. I use spacers between the top and bottom half of the gantry to ensure that the gantry is parallel to the bed.
Thanks for the question.
Fantastic review!
The metrics that make sense plus a well-articulated experience of the product and technical support have created a global sales pitch so effective making potential sales persons probably in millions, jobless!
I’m now ranking first SmartBench PrecisionPro Version in my search to replace my old 24″ x 35″ CNC.
Delete it or not, it’s still “sea change” not “seed change.” Why is it so hard for you to accept a correction?
Vic….you sir are not correct. Tried to explain it to you…and you kept going. How’s this? Furthermore….where do you get off thinking you know what our author meant? Maybe you should read up a bit! 🙂
Seed Change
A dramatic change or departure from status quo as a means of solving a problem, such as a paradigm shift.
Two possible origins; 1) in medieval agriculture farmers learned to reinvigorate their farm land by rotating crops. A crop that depleted nutrients would be replaced by a crop that fixed nutrients. This radical change required a seasonal “seed change” 2) before industrial agriculture farmers would save seeds, gleening the best seeds at each harvest to plant next year’s crop. If crops weren’t doing well a new strain with favorable characteristics might do better and new seeds would have to be found; hence a “seed change” would be required.