


Milwaukee ½” Cordless Router Review

Milwaukee ½” Cordless Router Review 2838-2
MILWAUKEE ½” Cordless Router Review 2838-2
For me, the most exciting feature about this router is that its more powerful than a trim router, boasting 2-1/4 HP, and it allows for either a ¼” or ½” collet. The higher 2-1/4 horsepower and larger 1/2-inch shank are better suited for heavy-duty routing jobs with larger bits. Additionally, I prefer using ½” router bits because they resist deflection better than a 1/4-inch shank bits. Larger shank router bits are especially important when using a long bit, which is subject to greater deflection, and when using a piloted bit, with a bearing.
First Impression
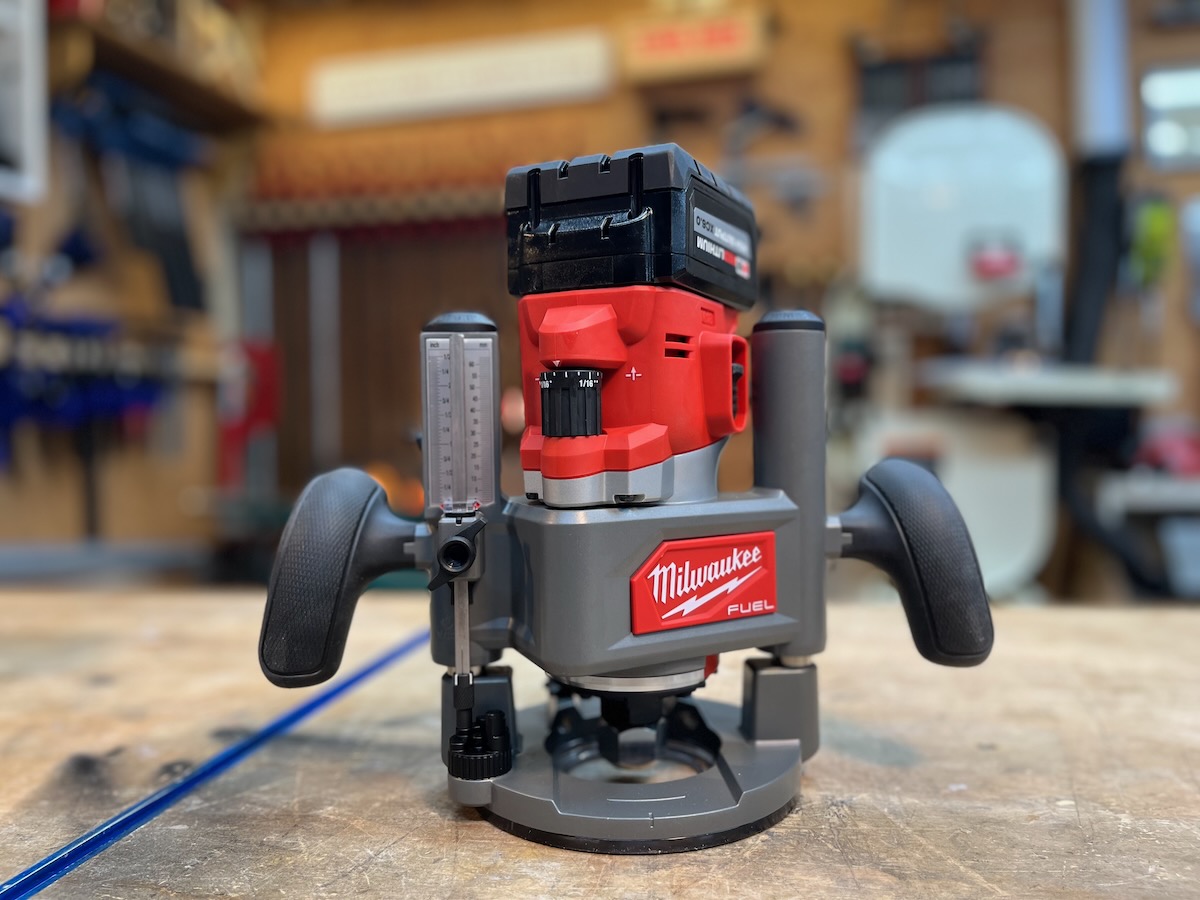
At first glance this router appears to be well made, with a robust aluminum housing, well placed controls, levers, and smart rubber over-mold. It’s plunge mechanism and adjustments feel solid, buts lets break this router kit down further and discuss it in detail.
M18 Router Features
• 2.25 peak horsepower
• ¼” or ½” collets
• Plunge base with 2.5” of travel height.
• Fixed base [Diameter 6”]
• Edge guide
• Dust collecting shroud.
• 6-step depth turret provides quick, depth adjustments at 1/8” increments.
• Depth rod has a micro-adjust knob allowing 1/4” adjustments in 1/64” increments.
• Macro-adjust button provides fast adjustments throughout the 2” of total fixed base travel.
• Variable speed dial from 25k to 12k
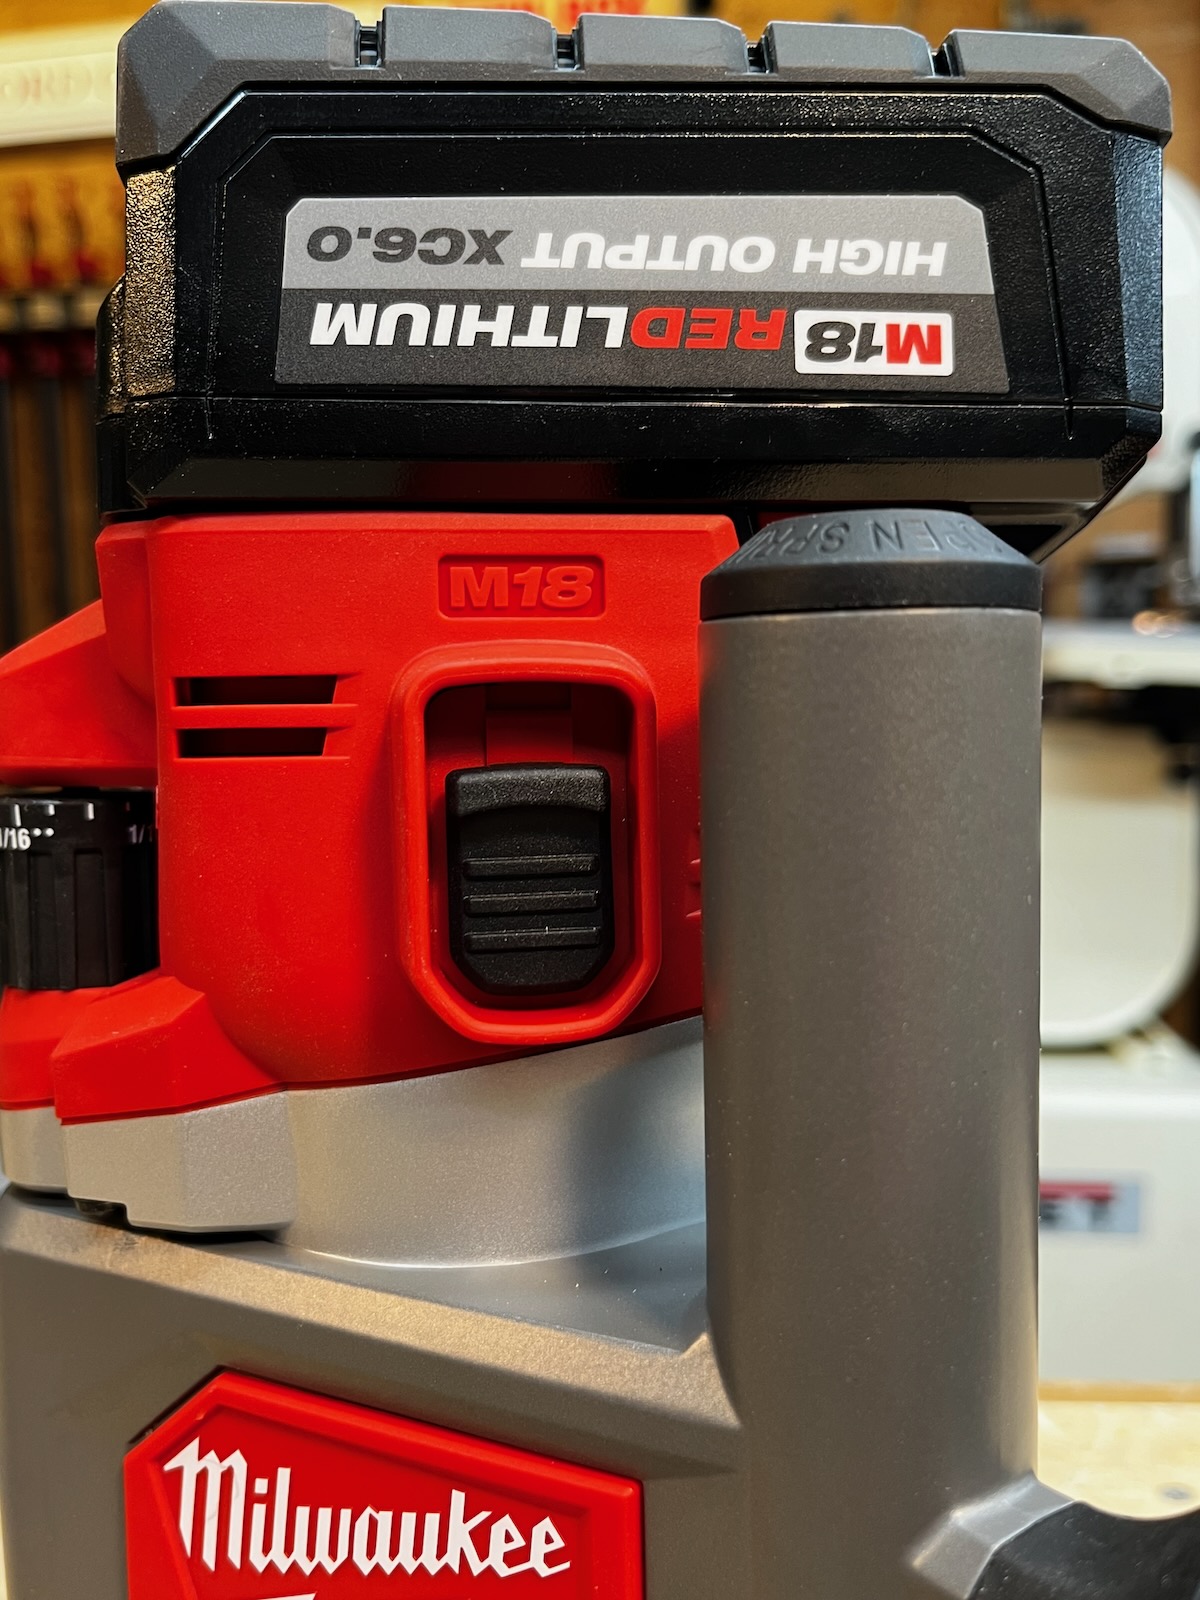
• Weight w/ 6.0 Ah battery 8.8 lbs. [6.2 lbs. without battery]
• Height 10.5”
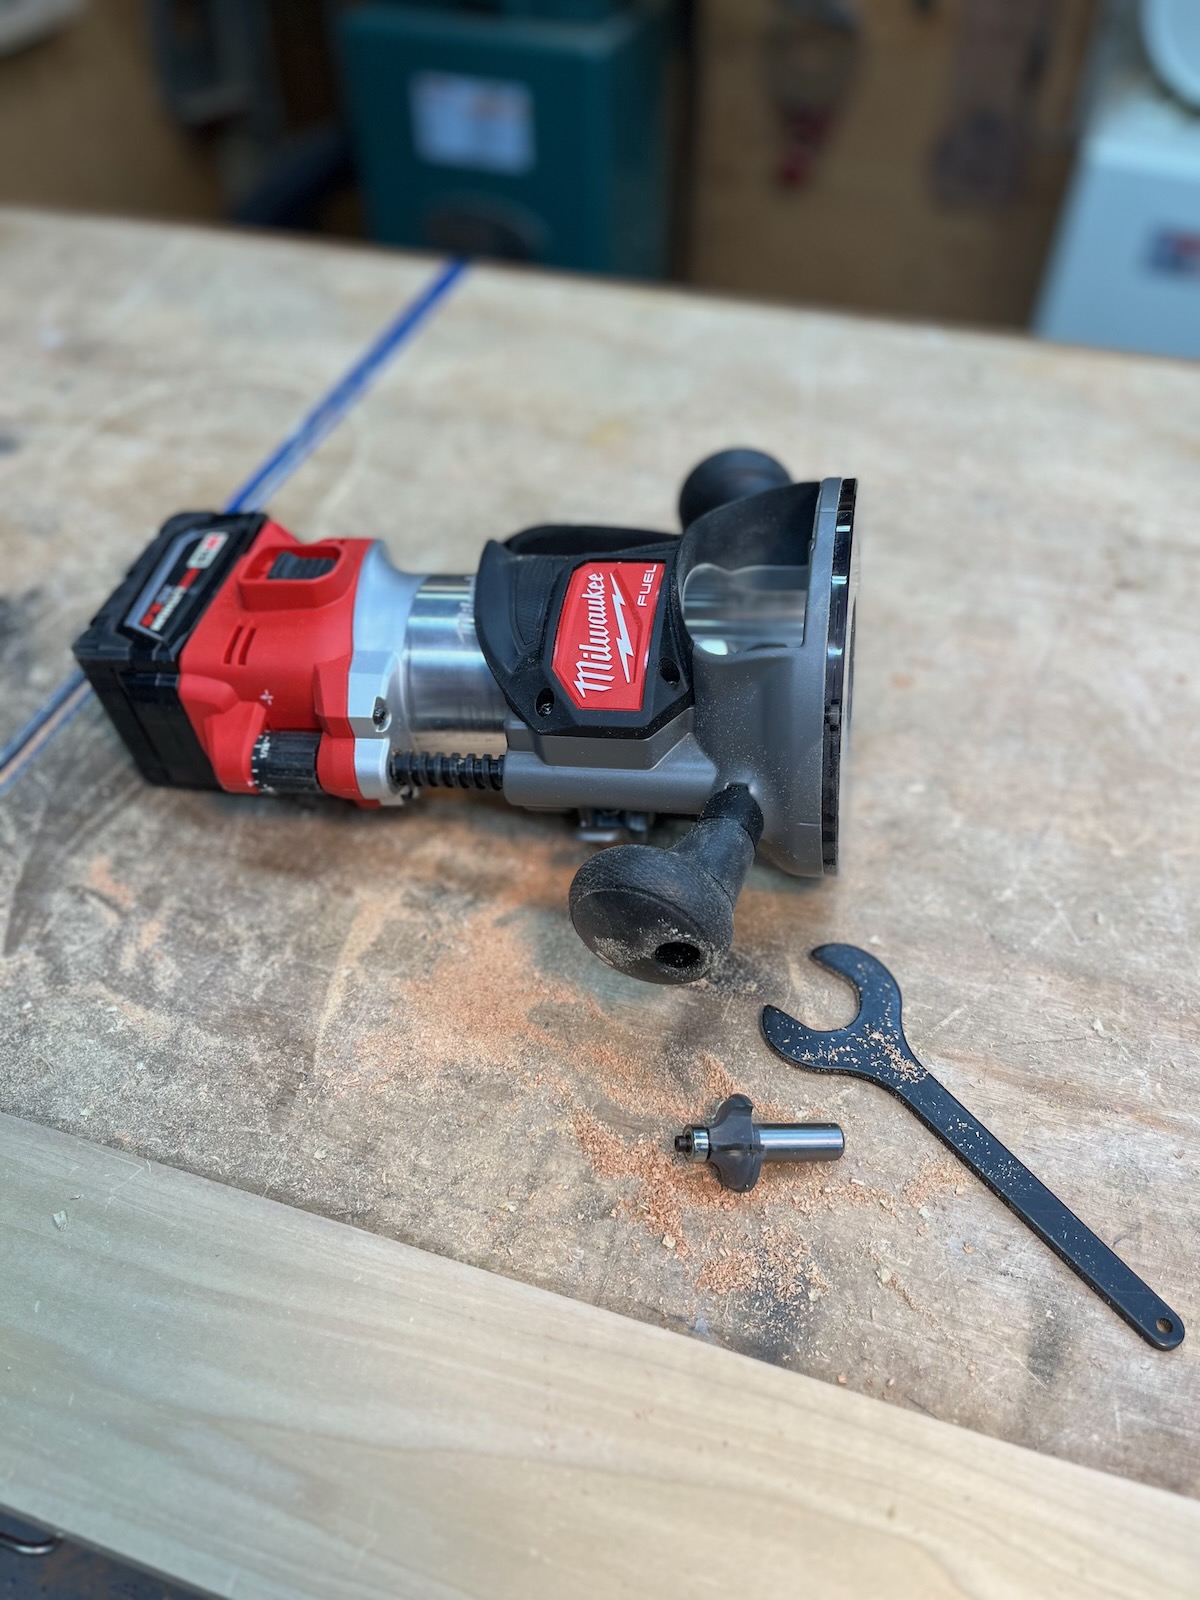
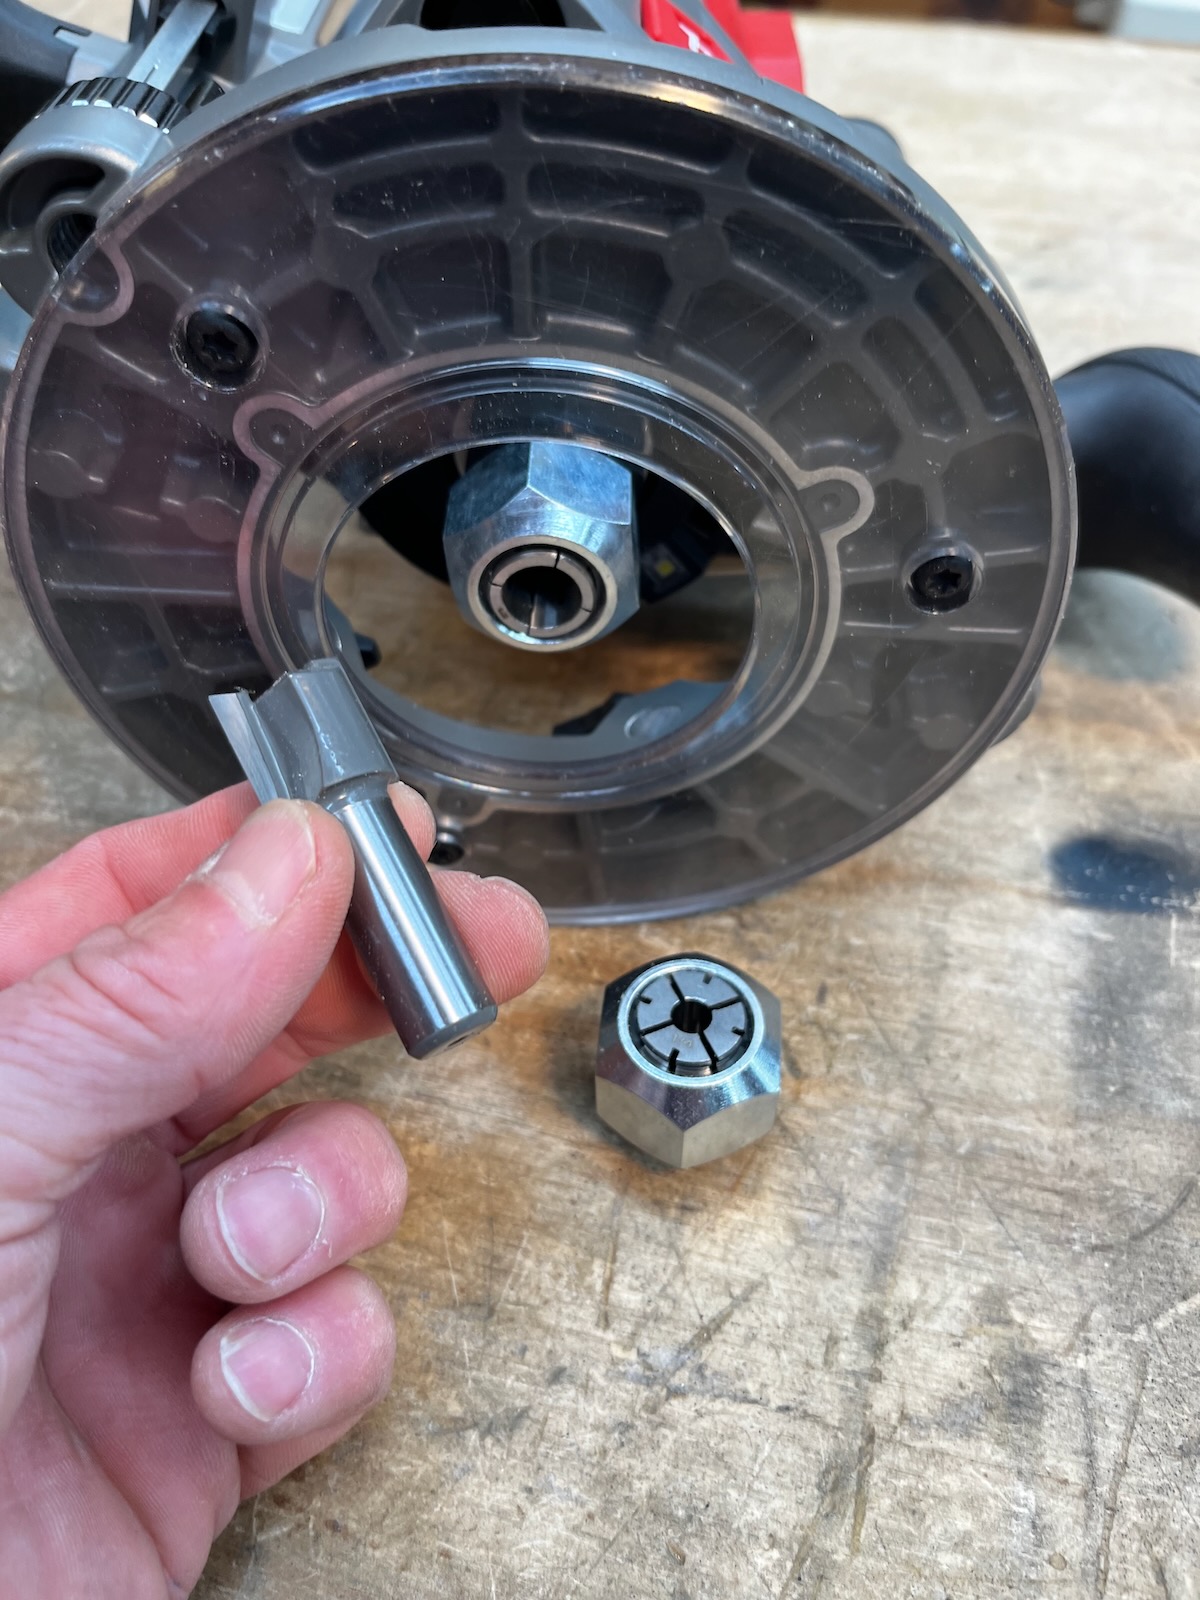
Spindle Lock | Bit Changing
Changing the router bit on the Milwaukee ½” Cordless Router is straightforward and can be done in two ways. A large red spindle lock button is located on the side of the router housing. This button locks the spindle, and must be held in, for a one-wrench bit change. Alternatively, you can use the two provided wrenches to change the bit.
M18 Router | Power Switch
The power switch is activated easily by sliding up with your thumb. This button is spring-loaded, allowing the router to be switched off with the slightest touch. I liked this safety feature and I appreciate that the electronic brake stops the router instantly, another nice safety feature.
LED Lights | Translucent Bases
The router body has two LED lights, and combined with translucent bases, worked well at illuminating the workpiece.

6 Variable Speed Settings
The RPM can be changed by the variable speed dial and is intuitive. The higher numbers correspond to faster rpm speeds and lower numbers to slower rpm speeds.
I typically use faster speeds for smaller router bits, softwoods, plastic, and laminates. The slower speeds are best used with larger cutters.
• Setting 1 – 12,000 RPM
• Setting 2 – 14,600 RPM
• Setting 3 – 17,200 RPM
• Setting 4 – 19,800 RPM
• Setting 5 – 22,400 RPM
• Setting 6 – 25,000 RPM
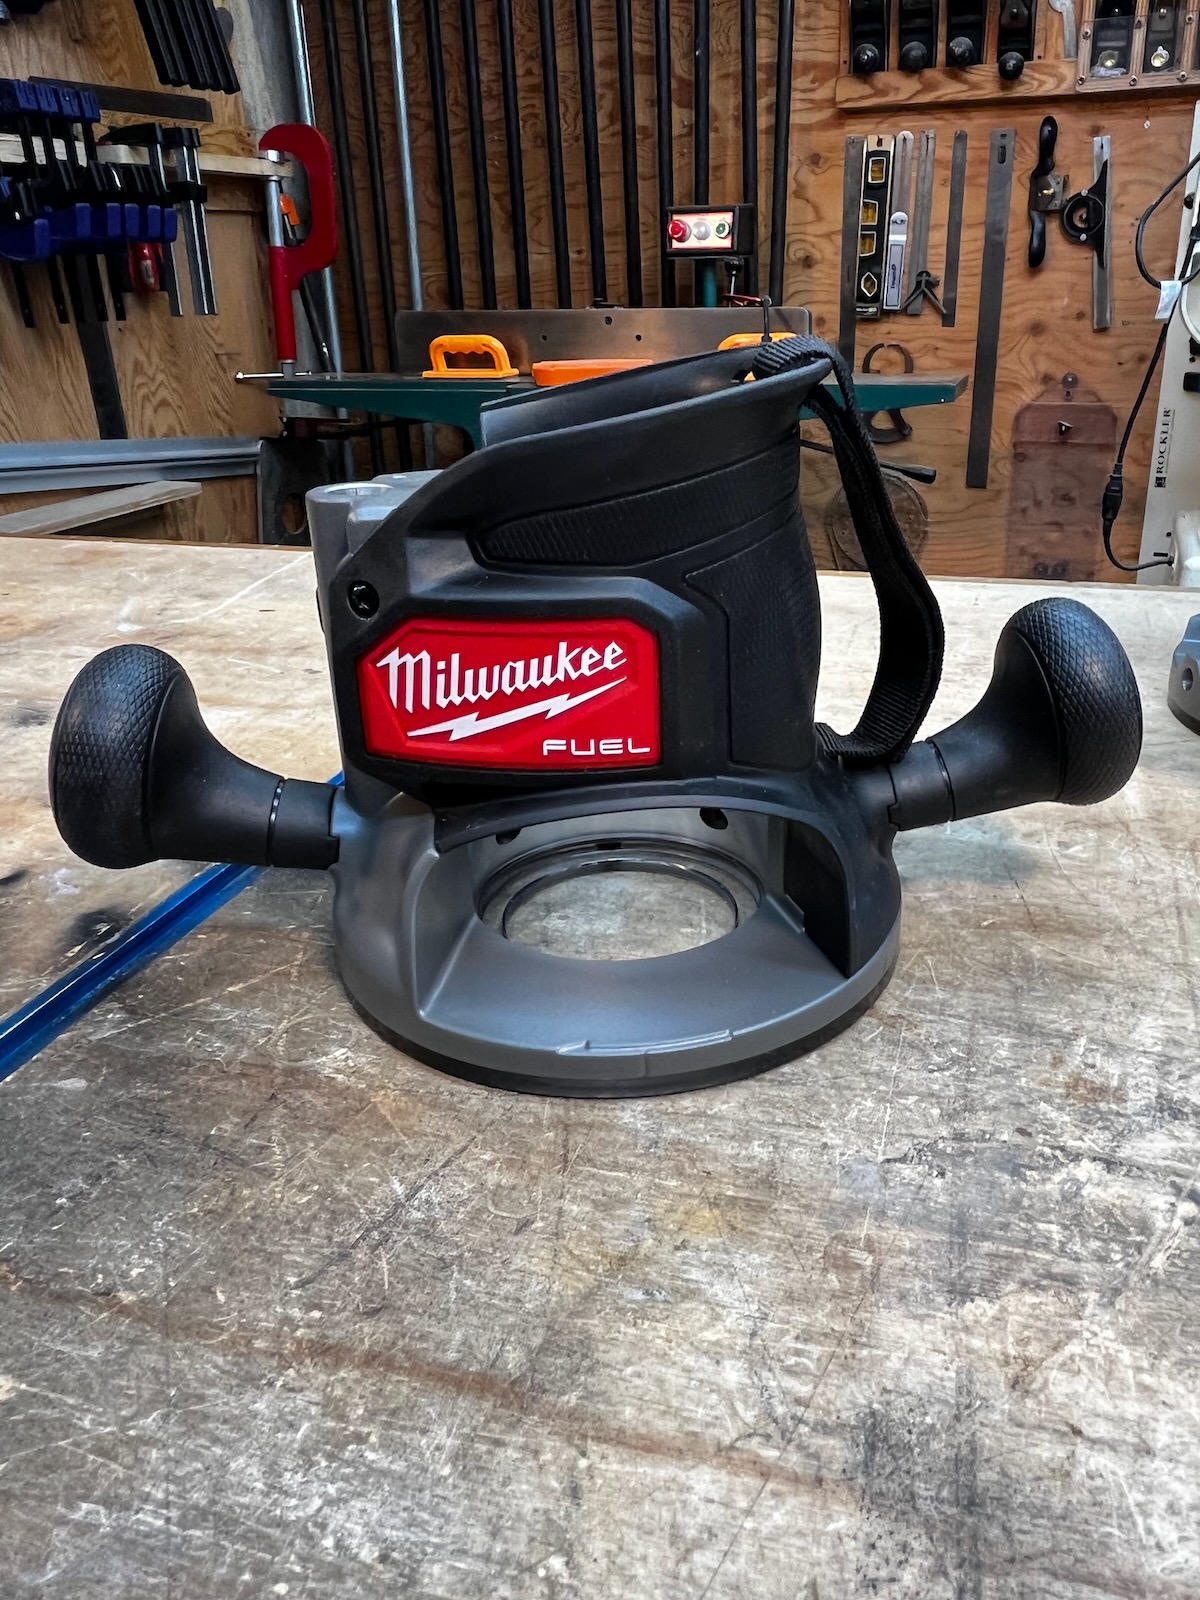
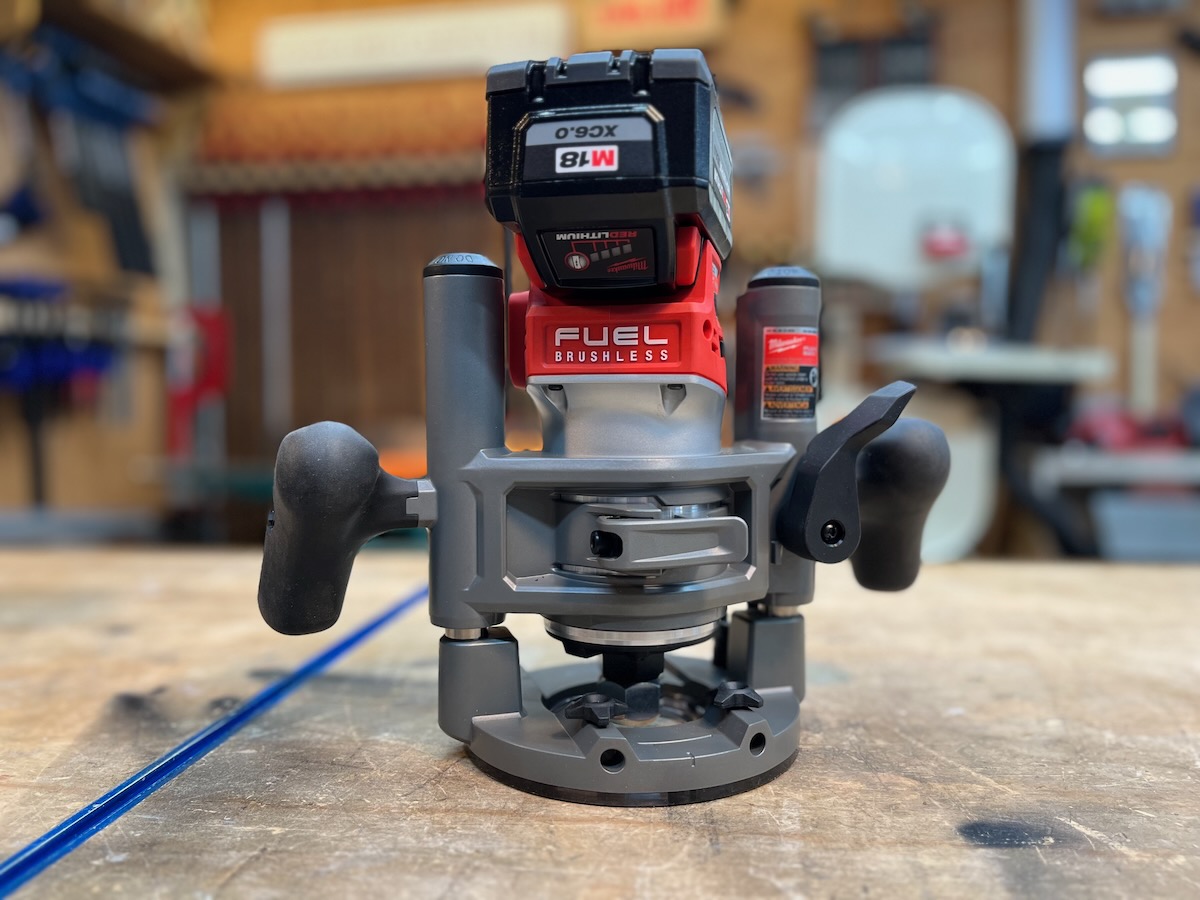
Milwaukee Fixed Base
The fixed base has a full-hand sized rubber over mold and a Velcro strap that allows for comfortable one-handed use. The fixed base has two ergonomically designed, rubberized handles that are securely mounted and indexed with a dado into the router body, preventing them from moving. The fixed base comes with a clear plastic sub-base plate with a 2-1/2” opening.
An optional, supplied 6” sub-base plate that accepts 1-3/16” guide bushings for templating is included, the dust shroud indexes nicely into the base. The router base plates have the same hole configuration as my legacy Porter Cable 690 router.
When mounting the fixed base, it indexes on the router only one way, and is clearly designed for a comfortable right-handed user power switch operation. Left-handed users must do what they always do – adapt!
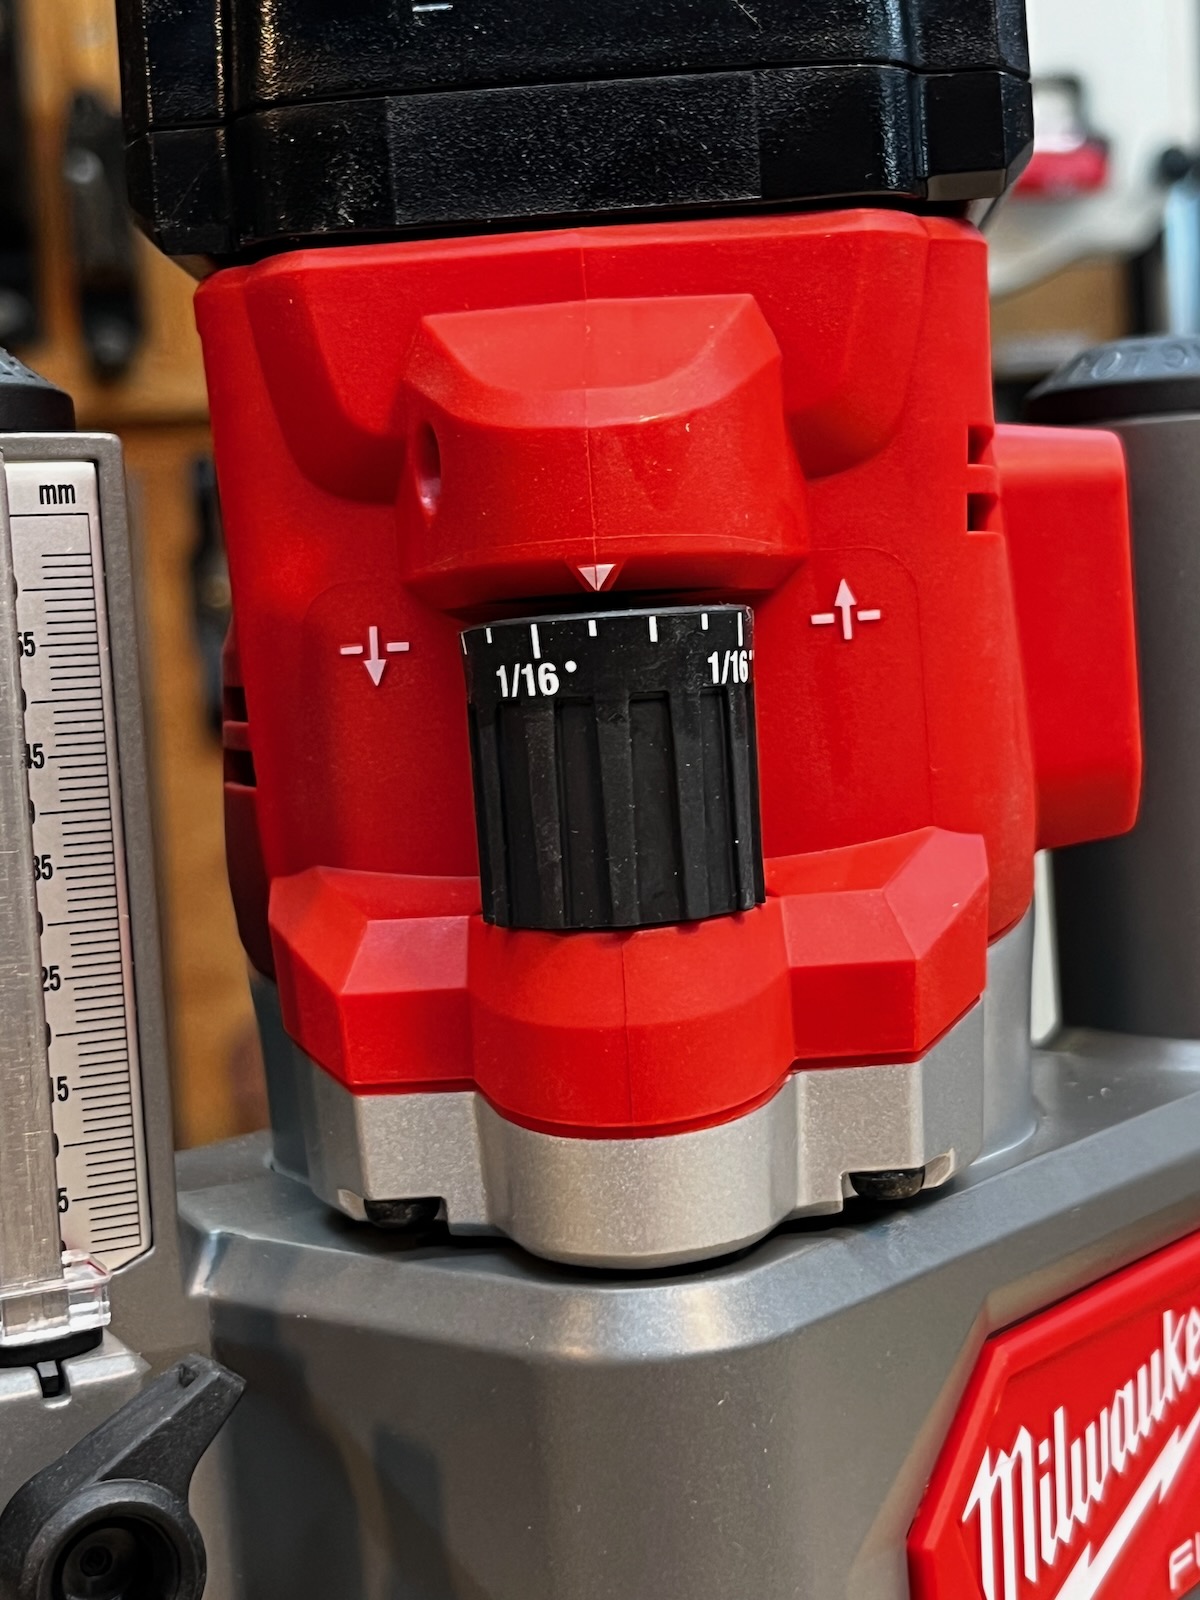
The router is equipped with a micro-adjust knob and the fixed base has a macro-adjust button with over 2” of travel. Adjusting the depth of cut is intuitive and easy to do by opening the locking lever and pressing the macro- adjust button with your other hand and then releasing to lock in an approximate depth of cut.
To fine tune your depth of cut, you can then rotate the micro-adjustment dial which moves the router base in 1/64 increments. Once you achieve your desired dept of cut, close the locking lever.
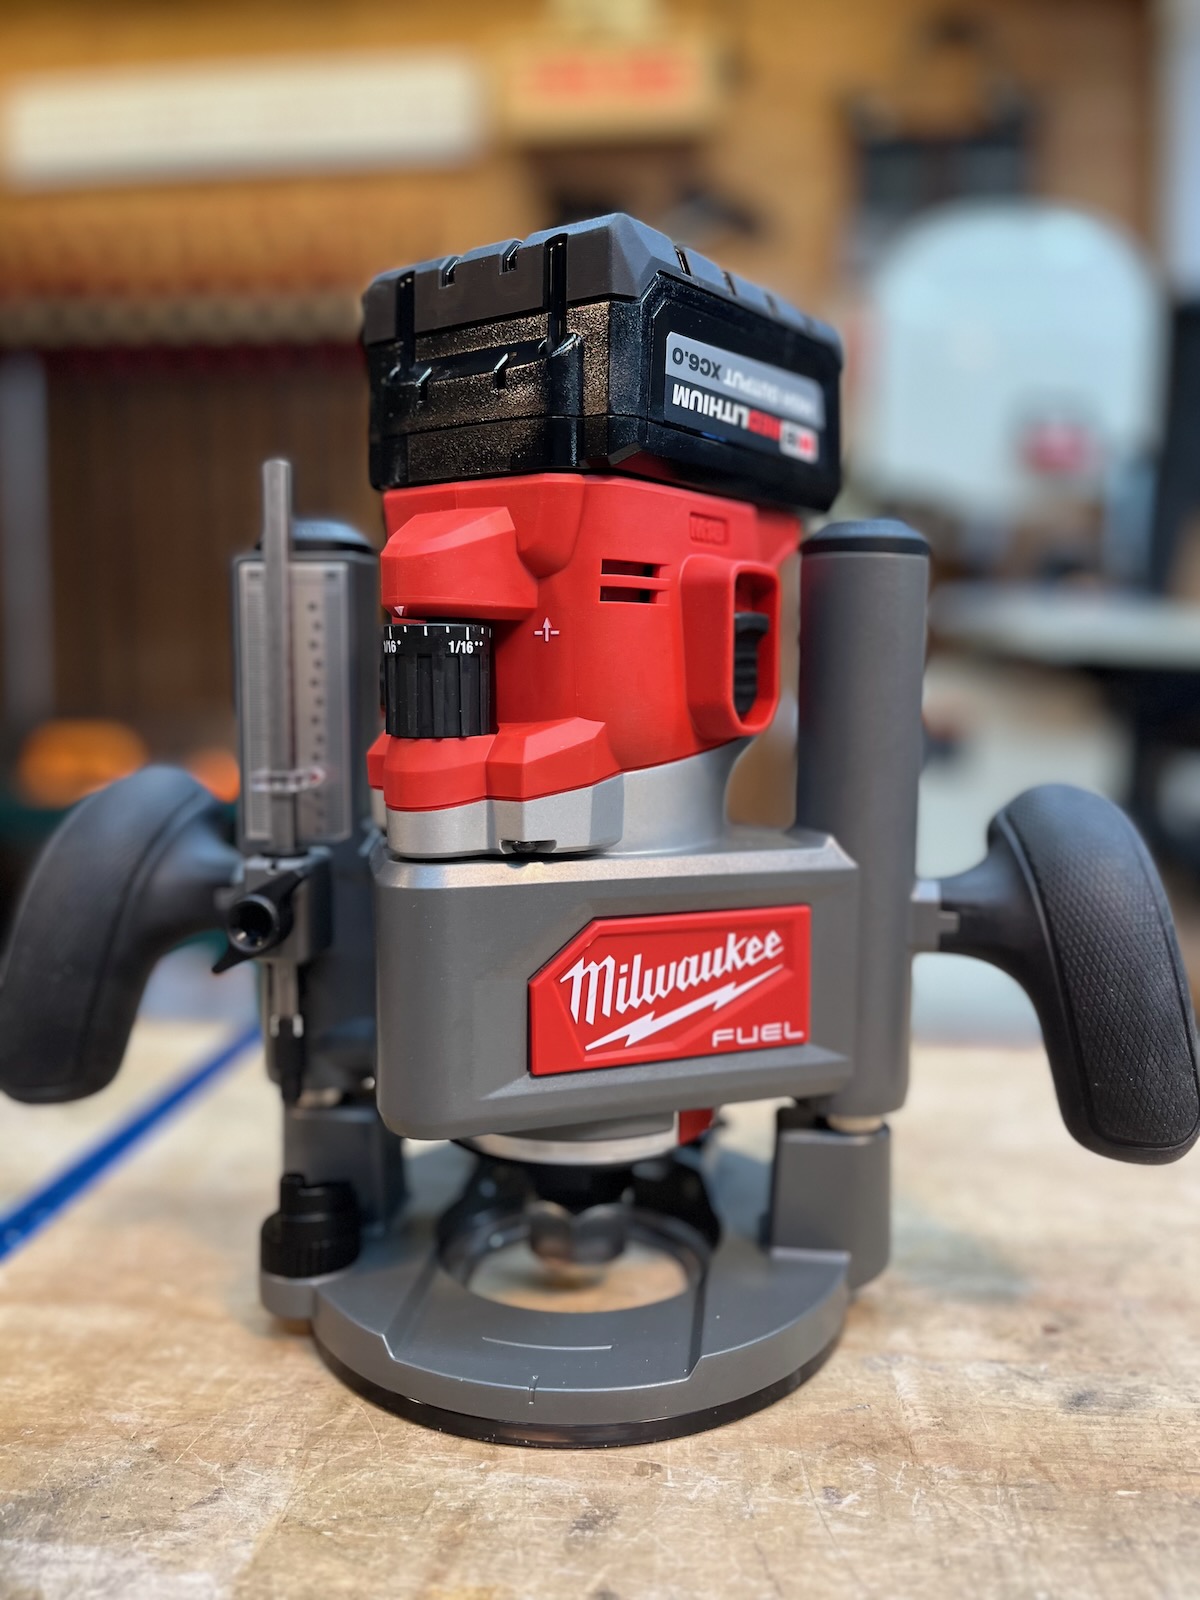
Milwaukee Plunge Base
The plunge router base also has two ergonomically designed, rubberized handles that are securely mounted and indexed with a dado into the router body, preventing them from moving. This base is also right-hand, power switch oriented. The plunge base comes with a clear plastic sub-base plate with a 2-1/2” opening.

Located on the left side of the router and smartly placed, the lever is activated by pushing down with your left thumb. Releasing the lever locks the router in place. The plunge base has a travel height of 2.5”
The routers macro-adjustment knob does not work on the plunge base. When using the plunge base, you can adjust the depth of cut can be set two ways:
1. Single pass cuts [cuts 1/8” deep or less]
2. Multiple pass cuts [cuts more than 1/8” depth]
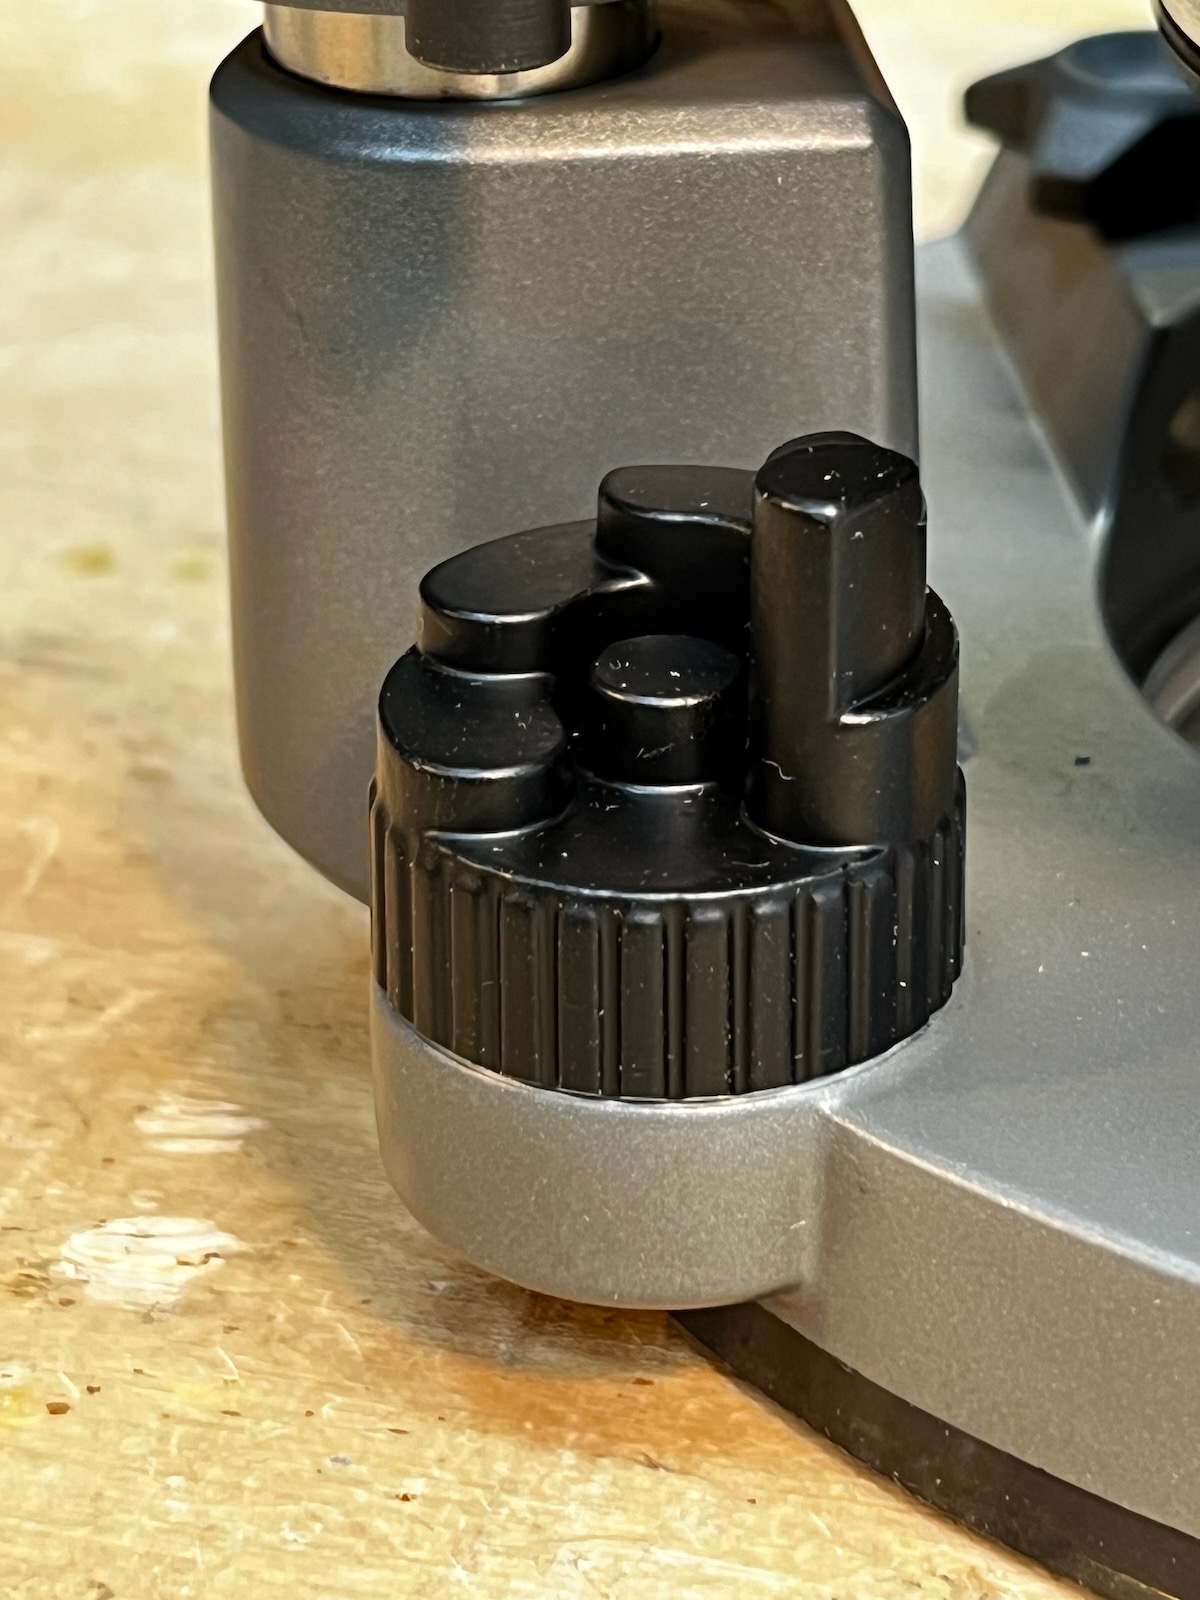
The depth stop turret on the plunge base has 6 settings:
• 0
• 1/8”
• ¼”
• 3/8”
• ½”
• 5/8”
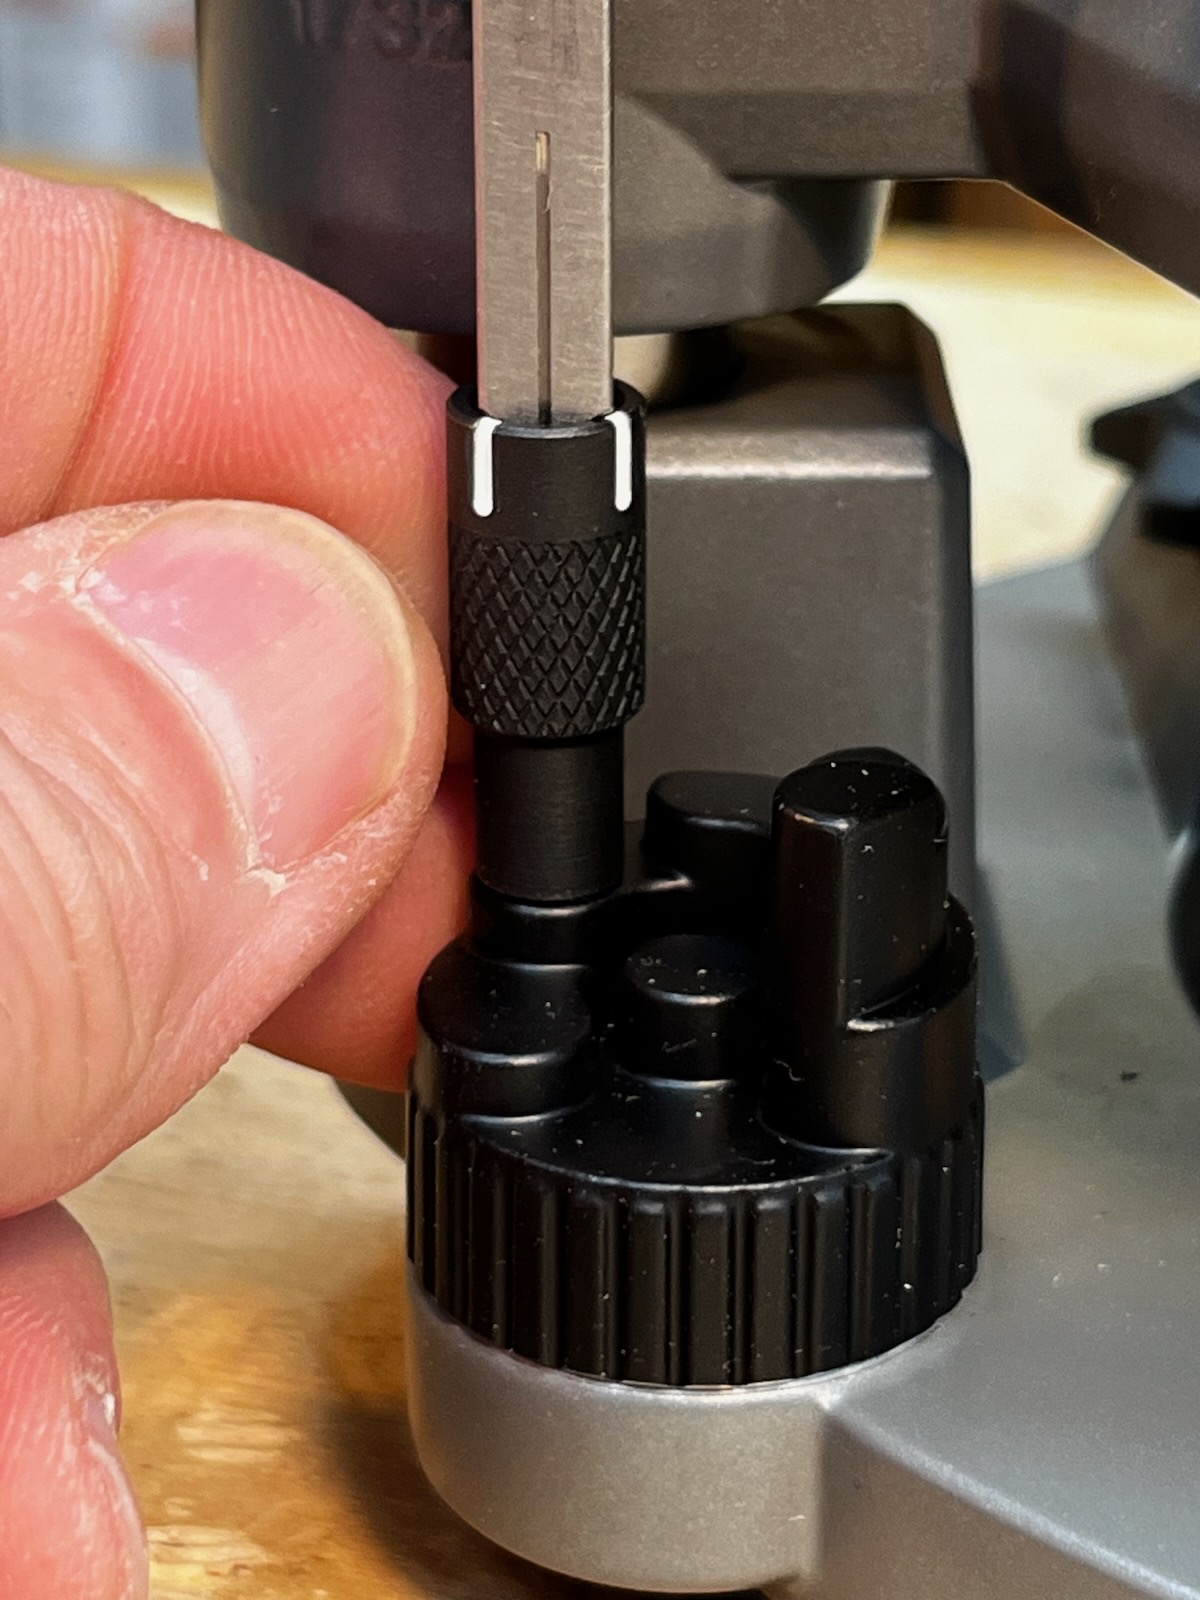
Additionally, the depth control rod has a micro adjustment knob at the depth rod bottom. This adjustment allows for a 1/4” of total micro adjustment on the depth rod. The thread on the micro-adjustment is 3/8”, but it’s recommended to leave at least 1/8” of thread engaged for a tight connection. This is a nice feature and one that I found myself using.
Single Pass Cutting
This is useful for making a single pass cut like a hinge mortise cut. To do this:
1. Rotate the depth stop turret so the 5/8” [highest] setting is directly under the depth rod.
2. Loosen the depth rod adjustment, and then unlock and hold the plunge release lever while lowering the router until the bit touches the workpiece, then release the plunge lever.
3. Then raise the rod and slide the piece to be mortised [e.g., hinge leaf] between the top of the turret and the depth rod, then tighten down the adjustment.
4. When the plunge base is engaged the depth of cut will be set to the hinge depth.
Multiple Pass Cutting
For cuts deeper than 1/8” multiple passes are needed. To do this:
1. Rotate the turret to its lowest setting [full depth] directly below the depth rod. Loosen the depth rod adjustment, and then unlock and hold the plunge release lever while lowering the router until the bit touches the workpiece, then release the plunge lever.
2. Slide the depth indicator to zero and then raise the depth rod to the desired height and tighten down.
3. Release the plunge lever, raising the router, and set the turret to its highest setting.
4. After making your first pass, rotate through the turret settings for controlled 1/8” deep passes.

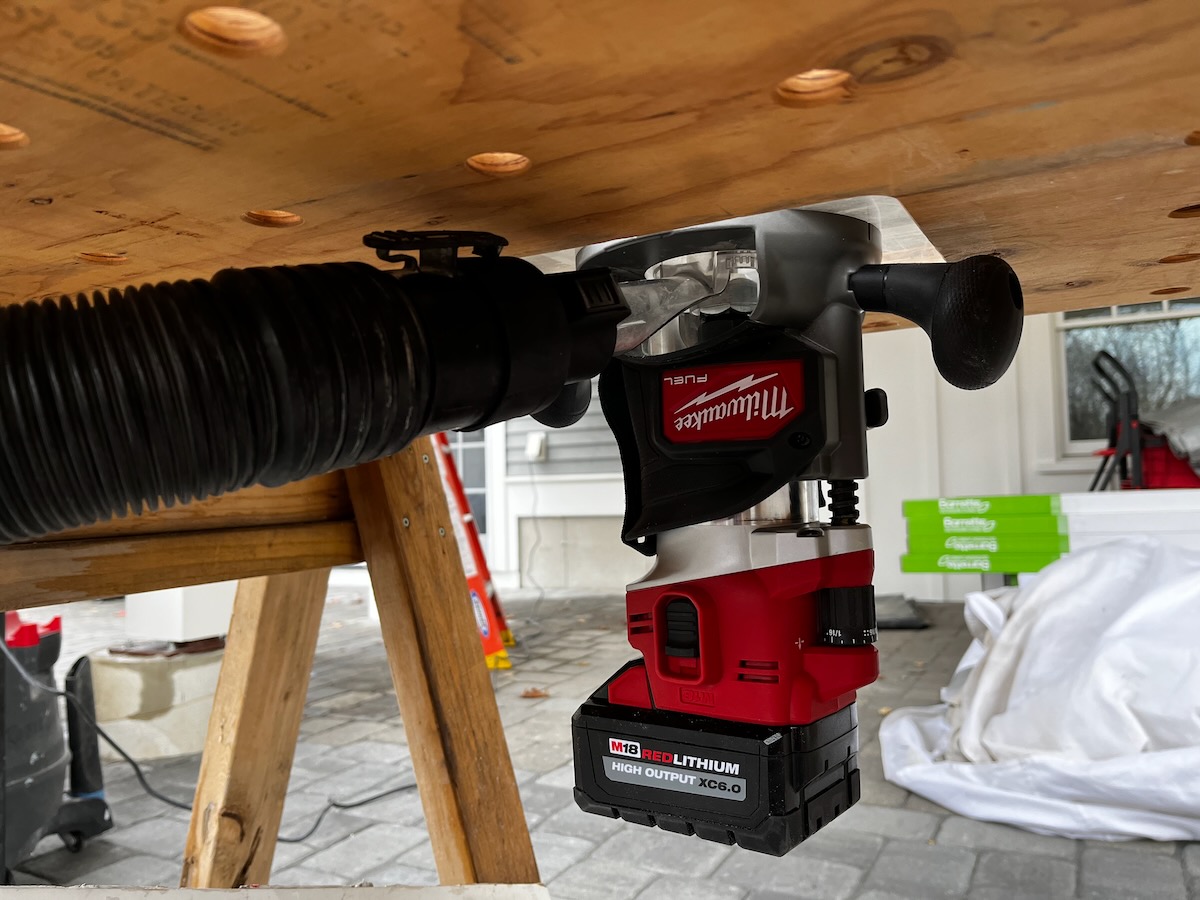
Dust Collection Shroud | 2 Methods of Attachment
The dust shroud has two methods of attachment:
1. With straight edge guide.
2. Without straight edge guide, using “u-rod” connector.

The dust shroud inserts into both bases, from only one side, and is held securely in place with either the provided u-rod connector, or with the straight edge guide rails and thumb screws.
I really liked how the “u-shaped” rod connector locked in the dust shroud – it’s intuitive, easy to use, and a great design.
The dust chute design was designed to be used on either side of the base, for added flexibility across the range of accessories, such as the edge guide, track adapter, plunge base.
We note that the angle of the chute maintains clearances and seemed to help limit interference with the hose and accessories.
Universal Dust Adapter
The router kit also comes with a universal dust adapter that clips and locks securely onto the dust shroud. The adapter fits 1-1/2” to 2-1/4” vacuums hoses, or you can connect a vac directly to the 1-3/8” diameter dust shroud.
Milwaukee Router | Template Base
The plastic shroud indexes into the template base, which has holes in it to better capture dust in blind cuts like template work or blind dados. It was designed for smaller diameter bits and its performance is best seen when using smaller bits.

Plunge Base Spring
The Milwaukee ½” Cordless Router has excellent power and an excellent feature set. It is easy to use and set up.
I noticed when using the router that the plunge spring is strong, requiring some force to lower. For this reason, you’ll want to ensure that your depth of cut is set when plunging. There was no wobble or slop felt in the plunge pillars or mechanism.
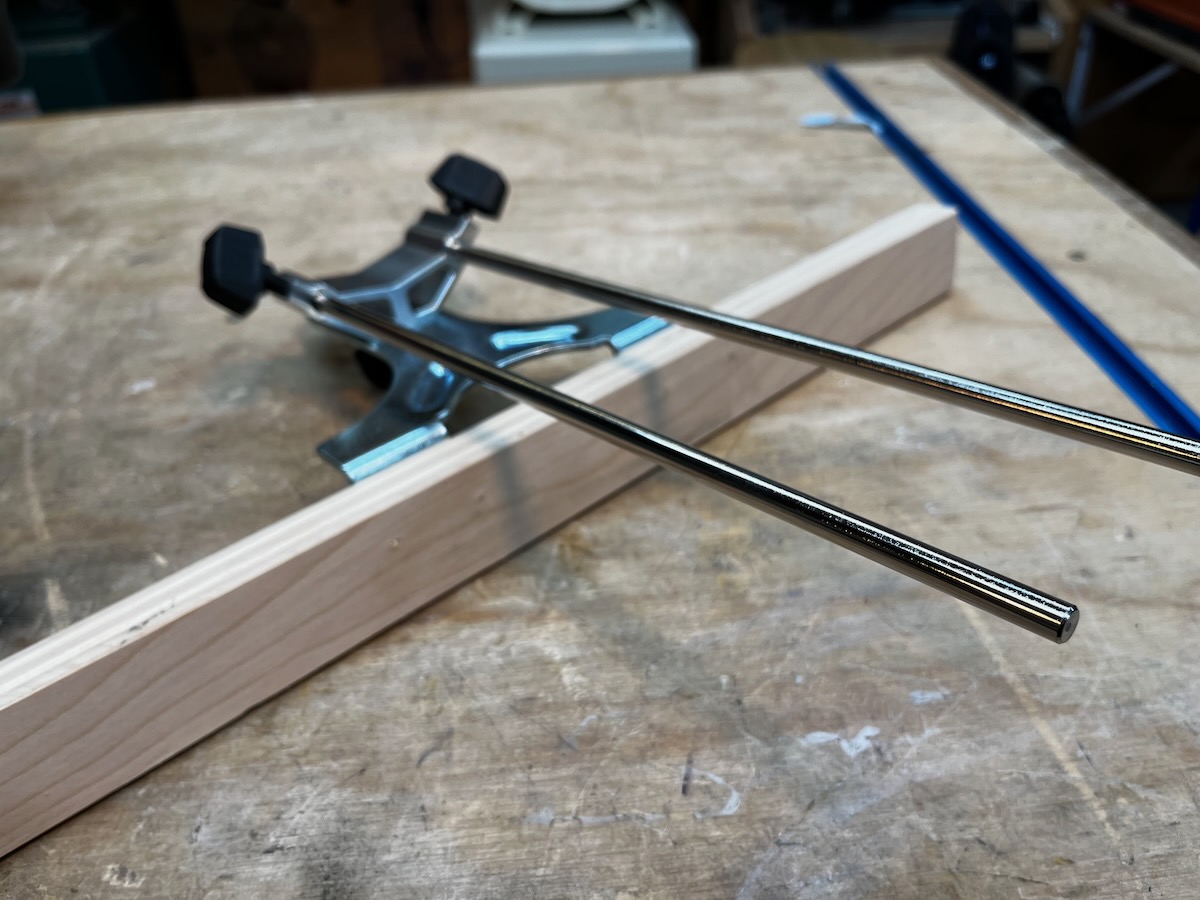
Milwaukee Edge Guide
The edge guide indexes into two slots located in both bases. It is solidly built and is secured with two thumb screws. The only thing I noticed is that the kit only comes with one set of thumb screws meaning you must remove them from one base, to use with the other base.
The guide works like it’s supposed to and gives you a reach of 9” from its farthest point, assuming you have the rods seated into one half of the base, with an additional 1-1/2” of secondary adjustment.
The edge guide can attach on either side of the router base. I found this flexibility useful and can see it being used with jigs and different situational needs on the jobsite. I added an auxiliary fence to my guide – there are 4 holes provided to add a fence.

Milwaukee ½” Cordless Router | Run-time Testing
To evaluate run-time, I routed ¾” wide dados, 1/8” deep, in Red Oak using a new ½” shank router bit. I used the stepped turret to make increasing deeper dados, 1/8” deep at a time for a total of 112.6 feet. The router variable speed was set at 4.5, not by choice but, because I forgot to check it.
When cutting ¾” dados the sweet spot seemed to be to use 1/8 to ¼” deep cuts, but this is all dependent on your wood species, feed rate, sharpness of bit, and size of bit.
Milwaukee ½” Cordless Router| Plywood Test
I know lots of you are wondering if this router has the power to cut through plywood sheathing for window cut outs. I mocked up a small wall section with ½ plywood and using a spiral flush trim bearing-bit to cut out a window. The Milwaukee had power to spare cutting through the plywood – it was a super easy process.

Milwaukee ½” Cordless Router | Dust Collection Test
I tested the dust collection while cutting ¾” dados, 1/8” deep in Red Oak. The dust collection was ok, not great. I should qualify this statement by saying I’ve never used a handheld router that had good dust collection. I find the best dust collection is achieved by using a router table and shop quality dust collection system.
While evaluating the dust collection I tried the shroud on both sides of the router and experimented with feed rates. I observed that using a slower feed rate did improve dust collection, as did raising the bit and returning it back over the dado. When I did this, the vacuum was able to remove all the sawdust in the dado.
Dust shroud note: It is not recommended that you plunge route with bits larger than the 1-3/8” dust port opening.

Milwaukee ½” Cordless Router | PVC Dust Test
On our job sites we typically use a trim router for small stuff but if were doing a big trim project we set up a 1-3/4 Porter Cable 690 router into a drop in router table. Wanting to be 95% cordless on our job sites, and curious about the dust collection, I decided to test the Milwaukee router in our table.
I had to do a slight field modification to the dust shroud for it to fit under the table, with the universal adapter. Because of the angle of the dust shroud, it hit the bottom of the table. To get it to fit better I sanded a little bit of the plastic off the shroud – it worked and fit under the table no problem.
We used the Milwaukee router to create windowsills and ease the edges of out interior trim, but the real win was routing PVC. PVC leaves a huge mess and we wanted to test the router with dust collection while routing. If you don’t hog out a ton of material in one pass the under table mounted dust collection system worked better than our dado test. Result, we’re sold on this set up for future pvc routing.

Using the Milwaukee ½” Cordless Router
The Milwaukee ½” Cordless Router has excellent power and an excellent feature set. It is easy to use and set up.
I noticed when using the router that the plunge spring is strong, requiring some force to lower. For this reason, you’ll want to ensure that your depth of cut is set when plunging. There was no wobble or slop felt in the plunge pillars or mechanism.

Improvement Suggestions
The Milwaukee ½” Cordless Router kit is a comprehensive kit, if I had to offer Milwaukee something to improve on, I would suggest they include a second set of thumb screws for the base-plate [edge guide]
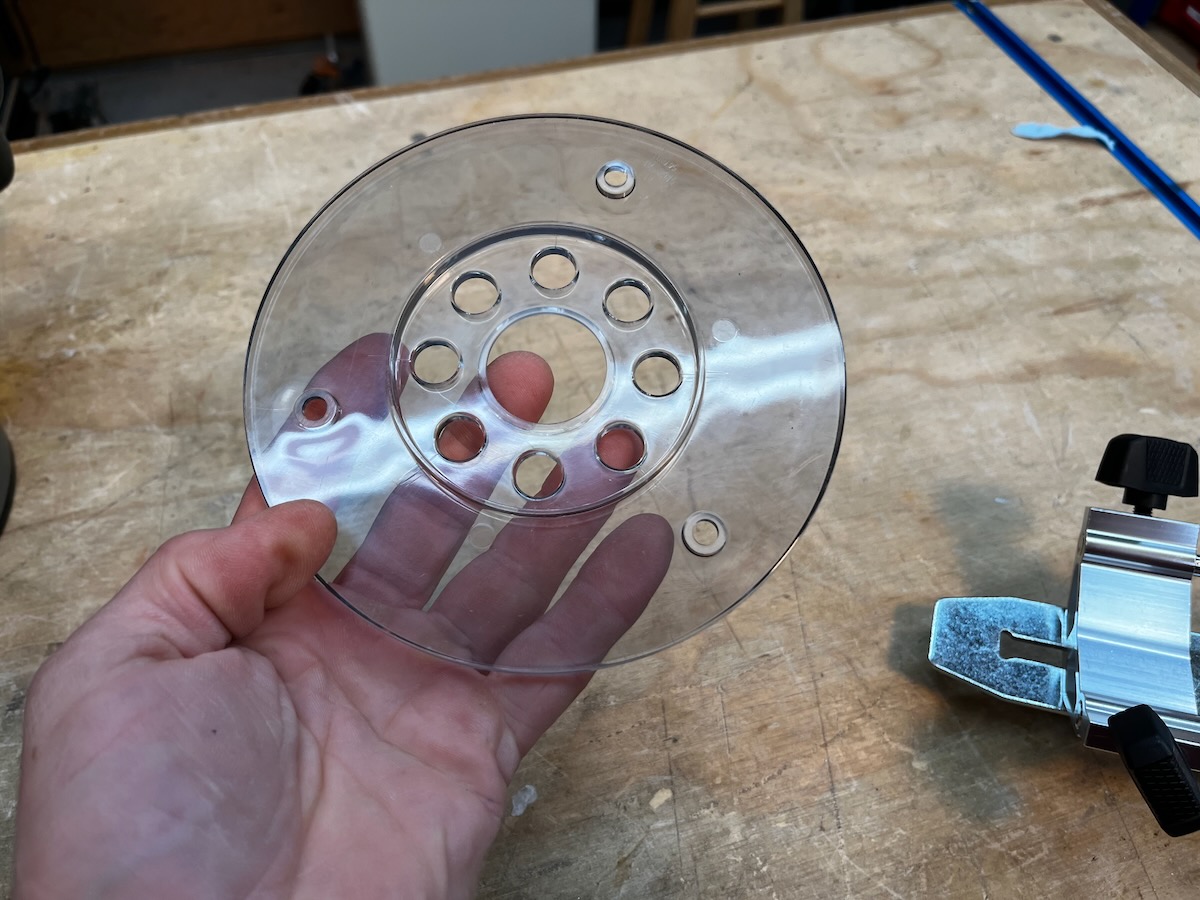
Another thing I will point out is the actual base plate screws. Now maybe it’s because I’m used to the legacy 690 router screws, but I did not like the Torx, Panhead base-plate screws, they didn’t fit in my plexiglass insert plate. The plexiglass plate has countersink holes, and the Torx screw heads protruded. I ended up using Porter Cable Flat [undercut] machine base plate screws.
The Torx screws feels like a modern improvement, but the reality is that a Phillips screwdriver is more popular and available on the job site. The Torx screws also had a blue thread-locker on them, making them a bit slow to remove.
While we’re on the topic of base-plates, I learned the hard way that the base plate has a protruding tab that indexes into the router plate, securely holding it in plate while you insert the screws. There is only one way for this to lock in and if you forget you’ll be looking at your base-plate not seated properly and must unscrew it to correct it. I’m guessing you’ll only do that once!
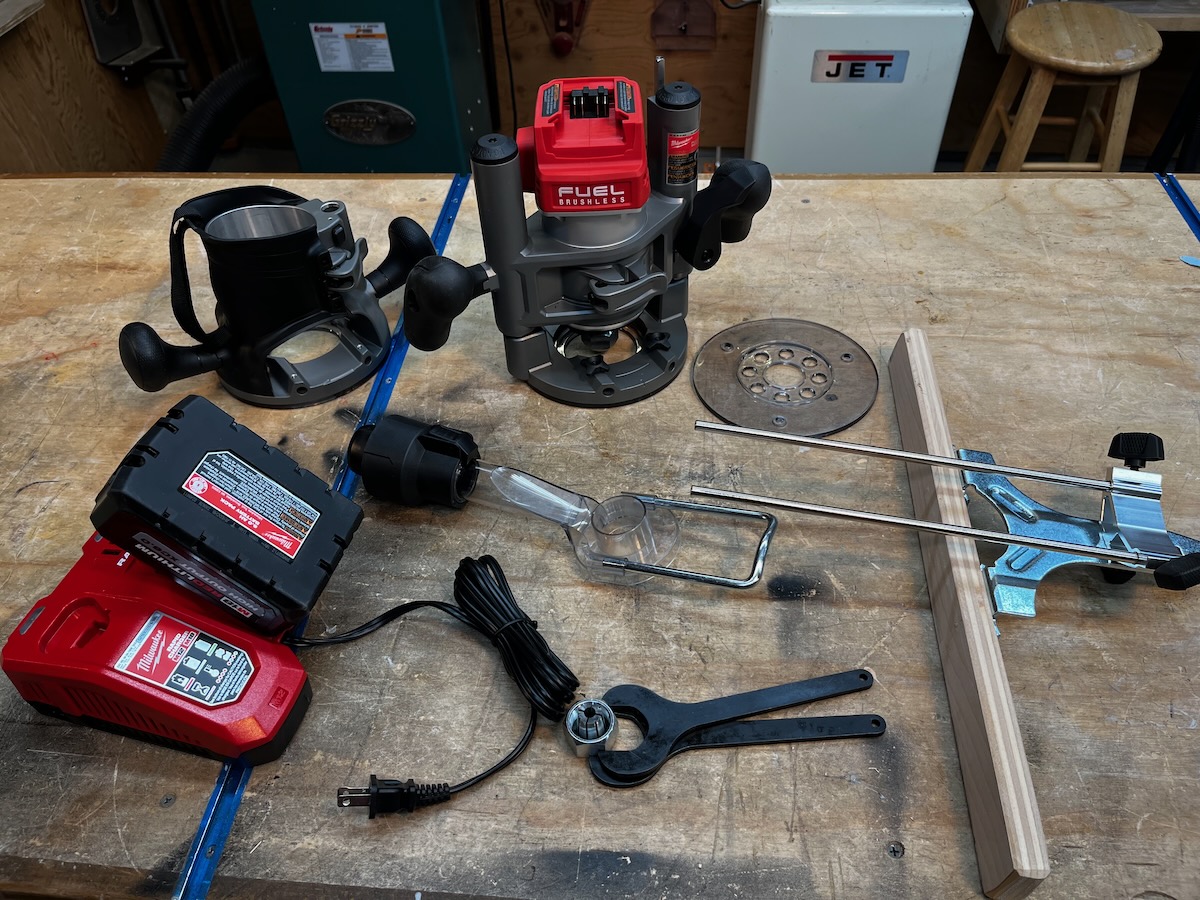
What’s Included in the Milwaukee 2338-21 Kit
• Router
• 6” Fixed base with a 2-1/2” opening
• 6” Plunge base
• 6” sub-base plate accepts 1-3/16” guide bushings for templating
• ¼” and ½” collets
• Straight edge guide
• Dust collection shroud and locking “U-rod”
• Universal hose adapter
• 6.0 XC battery
• Rapid charger
• 2 wrenches
• Tool bag
Price
The Milwaukee ½” Cordless Router kit sells for $599 at ACME Tools online, or as a bare tool for $349.00.
A very cool optional track adapter accessory is also available. Selling for $119 this adapter would be awesome when building [i.e., bookcase pin holes, dados, cabinets] The track adapter fits both the ½ router and the trim router and will work on Milwaukee, Makita and Festool tracks.
Milwaukee ½” Cordless Router | Overall Thoughts
Overall having the ability to use a cordless router with ½ shank router bits for larger profiles is huge. This Milwaukee ½” Cordless Router has the power, functionality, and accessories to compete with corded plunge and fixed base routers. It’s well made, and the kit is comprehensive.
We’ve been impressed using and testing it. It’s found a home in my van for sure!
Related Posts


About the author
Rob Robillard
Robert Robillard is a remodeler, general contractor, and principal of a carpentry and renovation business located in Concord, Massachusetts, and serves as the Editor of Tool Box Buzz and founding editor of A Concord Carpenter . Rob is in charge of our Tool and Product Review - Tool and Product Review - Video Channel, , where we post all of our tool reviews and video tutorials. Rob enjoys using his knowledge and experience to help and educate building professionals as well as DIYers on best practices in the remodeling industry. The Concord Carpenter's motto: "Well done is better than well said!" : Read more about Rob
http://www.aconcordcarpenter.com/@https://twitter.com/robertrobillardRob Robillard
Disclosure
Product reviews on this site contain our opinion of a product or service. We will always strive for objectivity and transparency in our reviews. Our goal is to provide readers with honest, objective information based on our own experiences. We never have and never will accept payment in exchange for a positive review. Many of the products that we review are provided to us for free by a manufacturer or retailer. In some cases, we also have advertising or affiliate relationships with manufacturers and retailers of products and services we review. For additional information please visit our additional disclosure policies.