


Quick Drill Storage Solution

Quick and Cheap Drill Storage Solution
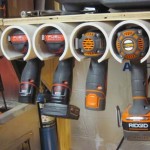
The holiday season is definitely upon us now. If your schedule is anything like mine shop time is a little hard to come by and money for tools or supplies might be a little tighter. Perhaps your friends and family told you not to buy any tools this season lest you wreck their intentions to buy you tools. I’m notorious for doing that and it really bugs my wife. Today I’ve got a quick and cheap project to get you a little shop time, organize all your drills and impact drivers, and not cost more than $10. It’s so cheap that you could make a set for your friend or family member that could also use a little shop organization. I made 2 sets to hold 3 drills, 2 impacts, and an oscillating multi-tool but you can adapt this project to your needs. Both 12V and 18V RIDGID tools and Milwaukee M12 tools fit in a 1-1/2″ slot but be sure to measure your tools to figure out the width slot you’ll need.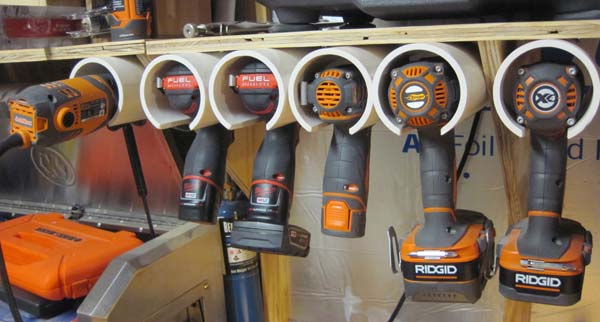
Tools Needed
- Miter Saw or Recip Saw
- Combination Square
- Sharpie
- Drill and/or Impact Driver
- Jigsaw or Oscillating Multi-tool
- Sanding block or sanding drum for the drill
- Bench Vise
- 1-1/2″ hole saw or spade bit
HowTo
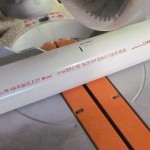
Step 1: Buy 2′ section of 3″ PVC pipe and mark it at 8 and 16 inches with sharpie. Home Depot sells these sections for just a few bucks. You could also use black ABS pipe but it’s more expensive and the melt point is lower so you would have to sand slower.
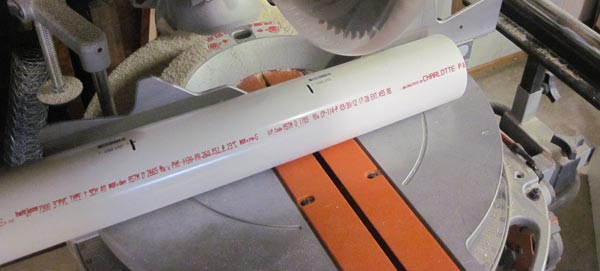
Step 2: Cut pipe with Miter or Reciprocating saw. Miter saw will cut it faster and straighter but recip will work too.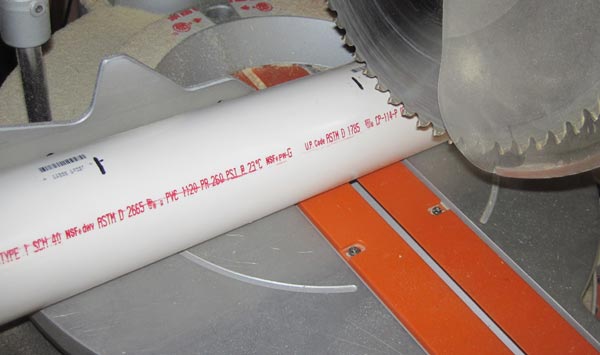
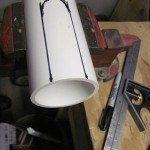
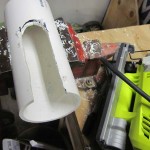
Step 3: Secure 8″ section in vise (or screw it down to the workbench) and mark a 1-1/2″ slot 5″ deep and round over the end.
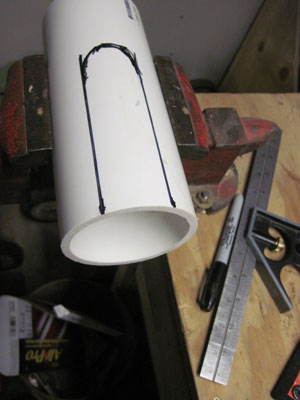
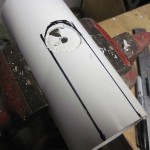
Step 4: Use a 1-1/2″ bit to drill the rounded part of the slot. I used a spade bit but eye protection is definitely needed. A hole bit is preferred but I couldn’t find my 1-1/2″ size when I made this. Jigsaw could also cut the curve. 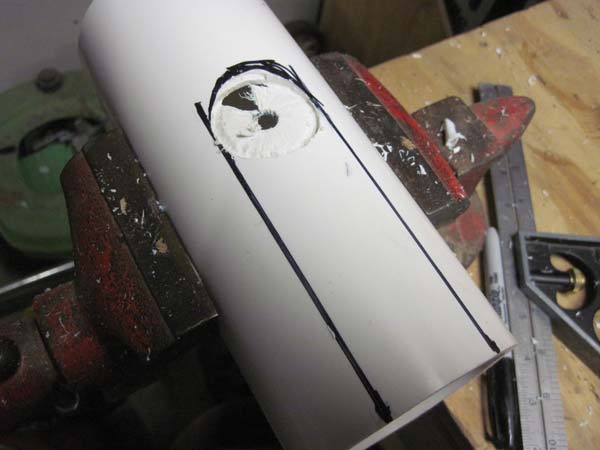
Step 5: Cut the straight lines with the Jigsaw or Oscillating Multi-tool. Take your time, cut level, part of the jigsaw base will be suspended in the air. It’s ok if your lines are not the straightest, they’ll be cleaned up in the next step.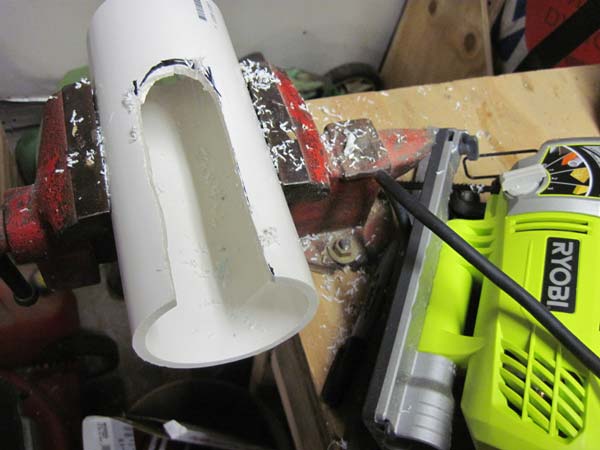
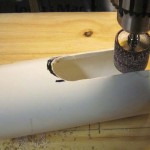
Step 6: Clean up the slot with a 1-1/2″ drum sander or sanding block. Use something aggressive like 60 or 80 grit to make this step go faster. If you have a drill press set the table height so that you don’t have to lift the piece. If using a drill press or cordless drill go slow enough not to melt the plastic. If you chose ABS than it has a lower melt point so you may have to sand even slower. If you don’t have a drill press this would be a great project to justify it’s purchase with your significant other! The Skil benchtop or Ridgid floorstanding press would be an excellent choice.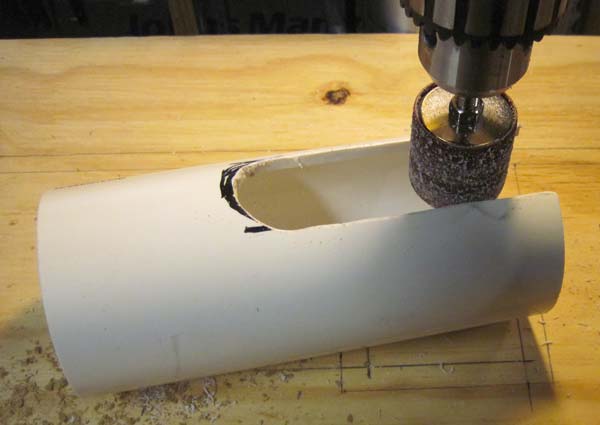
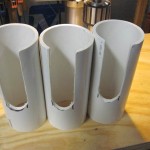
Step 7: Test the fit. This is a great time to check the fit with all your drills or impact drivers. Some may need additional sanding if the fit is too tight. 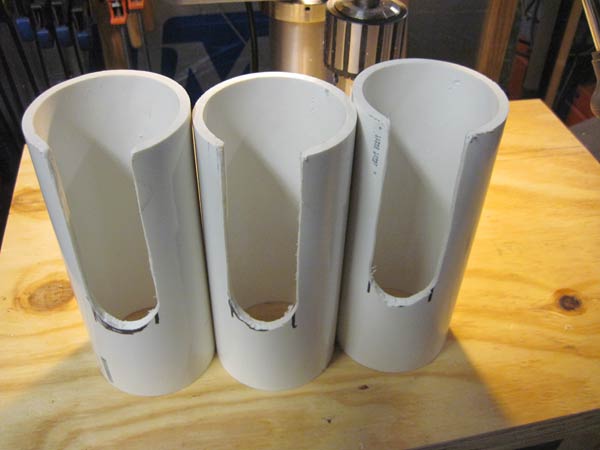
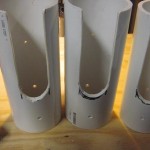
Step 8: Drill the mounting holes. In the picture you’ll notice 3 holes drilled in each piece. The third hole is an access hole for the screwdriver. It will have to be a hair wider than the long tip on the impact or hand driver.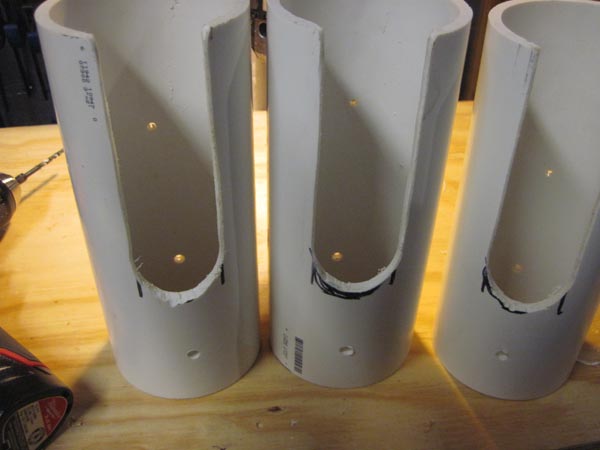
Step 9: Mount them and fill them up. I mounted mine to the underside of a shelf about 6″ from the wall. I did that so I can leave bits mounted in them. I also made one for the RIDGID oscillating multi-tool because I use it all the time. You could mount the tubes in a vertical orientation as well as long as they don’t rest on the triggers. All these tools used to be spread across the work bench. Much more convenient now.

About the author
Jeff Williams
Contributing Editor Jeff Williams is a carpenter for a commercial General Contractor specializing in concrete, steel, and wood buildings. Jeff comes from a long line of contractors. His parents started a commercial General Contracting firm many years ago and it has afforded him life-long, hands-on learning opportunities from rough and fine carpentry all the way to structural steel and concrete. Jeff has a Construction Management degree and loves the thrill of coordinating and successfully managing large jobs from start to finish. Inspired by the difficulties sometimes encountered to complete punch lists his motto is, "Work hard until the job is done."
11 Comments
Leave a comment
Disclosure
Product reviews on this site contain our opinion of a product or service. We will always strive for objectivity and transparency in our reviews. Our goal is to provide readers with honest, objective information based on our own experiences. We never have and never will accept payment in exchange for a positive review. Many of the products that we review are provided to us for free by a manufacturer or retailer. In some cases, we also have advertising or affiliate relationships with manufacturers and retailers of products and services we review. For additional information please visit our additional disclosure policies.


Great idea.. I could really stand to do something like this..
[…] When you need a drill/driver it seems like it can’t be close enough. Ours is often sitting very close on the work bench however that’s not a great place for it as it’s very easy to knock off the table or often in the way. This solution is very nice because it keeps it off your work surface but still very close at hand. I like the holster feel although I might waist too much time trying to improve my quick draw skills. Get the full How To on ToolBoxBuzz.com. […]
love the idea going out now put it under my shelf
Thank you. I love the interwebz, 5 minutes searching, and here i am. Just made 4, will make a couple more, and made a variation for my Porter Cable 6″ orbital, just cut a slot for the cord, mounted vertically.
Again, thanks,
dean
Like this ideal, got it added to my garage, cleared some needed counter space.
Thanks
Ed.
very clever power drill storage solution, makes great use of some left overs from other projects. Thank you for sharing!
WOW GREAT IDEAL, REDOING MY WHOLE WORK AREA
LOVE HOW YOU CAN STORE BATTERY CHARGER WITH IT
This was a great idea and works differently. However I did a couple of things a little different. I used ABS pile instead of PVC, it was a little cheaper. I kind of knew this going in, but ABS gums up a little more when you cut it, but it isn’t too bad to clean. Second, I didn’t have any room to put a new wooden shelf; and I did not want to drill into my metal cabinets, so I used a whole saw to cut wood plugs for the back of the pipe. I inserted the plug into the pipe, used a couple of screws threw the sides of the pipe into the wood to secure, and then drilled threw the wood into the wall and secured the pipe directly to the wall. Looks pretty clean.
I made 12 of these yesterday. 3″ was too small for the Makitas that I have (on the ones it fit, it rested/put pressure on the direction selector), so I went with 4″ and hung them upside down.
I’d recommend not using a spade bit as it will send out sharp shards of PVC. just mark the line and use the jigsaw. Also make the jigsaw cuts and drill the holes before you cut off the 8″ piece. That way you a working on a long piece that won’t move much and don’t need a vise.
THANKS!!!
Just got done making 3 of them.
Side mounted instead of under shelf.
https://www.flickr.com/photos/rnranimals/51737800706/in/dateposted/
Loved the idea. Made 3 today. Help me to clear my workbench. Used a multi tool for straight cuts and sand. Used 1 1/2″ doorknob bit for curve. will probably make 3 more. Thank you for the idea and measurements. Cut 1 1/2″ slot all the way thru to hold multi tool. IMG_2928.jpeg